A place for me to display some of the varied projects that come out of my shop, as well as to "talk" about some of my experiences working with wood.

Wednesday 5 October 2016

Cranking it out here at the Sausage Factory

I have been mostly home since June so have had plenty of time to spend in the shop. There also has been no shortage of requests for an eclectic mix of projects. This post will show just how varied the things I get asked to build for friends and family.

Several of these projects are a direct result of the new house bought this Spring by my eldest. We did a gut-job on a bedroom that had some ungodly stucco-like material globbed on the walls. Lots of new flooring in the entire basement and some bedrooms, and a few woodworking projects.

First up is a sideboard to go with the dining set I made a few years ago for him. This provides some much needed storage in their expanded environs.


Painted and Stained Sideboard to match existing dining room set

 A fence to ensure the Yorkshire monster does not make an exscape from the compound...


Nice wooden fence to keep Rudy in and the Rakins out!


Before...


In an unfinished room that was to become the gym, we decided to enclose the power panel, to reduce the ugliness...


...and after.


Simple plywood sides and laminated pine-panel doors make short work of this enclosure.


He also needed a place to organize his sport equipment, so I made a stand to fit in the corner which looks like a pallet...

I made this from an old table...

Let the drill press do the heavy lifting.

And now for something completely different...

One Saturday afternoon in August I was perusing the woodworking blogs and saw a project where a guy used a Kutzall grinding wheel to rough out a bowl from a chunk of wood. I use this setup for grinding seats out for chairs and rockers, so I said "I can do that".


An voila another pieces of "bowl-ware" that I will need to find a use for.


A window to nowhere in particular
The kids are not the only ones requesting "off-the-wall projects" SWMBO wanted to recyle the windows we kept when we replaced the front door. I decided to install the sidelight piece in an interior wall to cast some light in the back hallway. This turned out quite nice.

She also had a request to make some props for the front step to hold some harvesty type decorations. I have been storing some western red cedar in the shed for years, so lugged it down, ripped it up and turned out a couple of sets of these. One set is going to one of the sons (of course) and the other will grace our entrance for the fall season.

It has been a busy, varied and glorious summer, time to move the operation inside. I have several exciting projects planned for this fall, so stay tuned.

RDW


Thursday 25 August 2016

The Luthier is Out!

It's been a long while since I have done a project post due to a multitude of factors. I have been travelling extensively with minimal time at home over the past few months. Son#1 bought a house and needed my help on the few days I was home over that period, so the shop stayed more or less idle for a few weeks. The project featured in this post has been finished for a couple of months just waiting for some studio time to get some proper shots done.
My "Fretboard Bench" and Koa 000-14 #5

Instrument building phase complete Dave...

Probably more than 10 years ago, for a number of reasons, I chose to build a guitar. And as so often happens with my interests, it exploded into a full-on instrument building phase of my woodworking journey. When it was all over I had managed to complete 10 acoustic guitars, a Benedetto-style archtop, a couple of mandolins, and a few electric guitars and basses. Once this challenge was met and I felt I had achieved all I could with it, I stored my jigs and tools away to move back to furniture and other assorted undertakings.

The one key take-away I have from my instrument-building journey is that the level of precision and attention to detail necessary to build good instruments was well beyond where my skills were at the time. Today I have a better appreciation for what is necessary to do work at the quality that I can be proud of. I continue to tell my friends, if you want to take your woodworking to the next level, build an acoustic guitar, you will not be disappointed.

At the end of last year, I realized it was time to move out the dormant instrument building tools & jigs to make room in the shop. I got in touch with a young guy nearby who was starting up a luthiery business and we worked out a deal that worked for both of us, and I was officially out of the instrument-building business. I had given a few of the guitars I made to friends and family and kept the rest.

I did however, have one last music-inspired project I had planned to build and this Spring I made the move. I have not done a lot of mixed media projects in the past, but to achieve the effect I was after, I needed to do so. I chose aluminium as the metal of choice as it was easy to work with woodworking tools, it is lightweight and the colour worked for my purpose. The project was a bench which would look like the fretboard of  guitar. I had purchased the curly maple board for this purpose about three years ago and had been stepping over it ever since.

Fretboard Bench

The bench is made from soft curly Maple with aluminum "frets" and legs. Side dots and fret markers are Cocobolo.


The build of this was an interesting exercise as I had a very specific picture in my mind of the final product and needed help to achieve it. My buddy Joey the machinist would make the aluminium base and another friend in the metals business got me the aluminium strips for the "frets". Here's the studio shots of the finished project, followed by a few shop shots chronicling the build.


Working out the layout of the frets and dots. Using the width of the board as the base,
I extrapolated that to a scale length of 250" and chose a start of the 3rd fret so the 12th fret would fall within
the length of bench I wanted. The layout of the is shown as well.

And yes it must have side dots... and be tapered. I used my Festool track saw
and a shim to make two cuts to yield a 1/4" slot for the frets. It was much easier to line these
slots up while the edges were still parallel.

I wanted a simple design for the legs to minimise the distraction from the woodwork.
Here I am testing out the stability on some plywood to work out the leg spread.
These have a wider plate on the top which is screwed into the base.


Since this was to be true to the fretboard design I wanted to radius the top like the real thing.
A bit of a tradeoff between comfort and staying true to scale. I removed 1/2" at each edge to provide
a pleasant curve for the sitter and enough for the viewer to know it was radiused. After the board was tapered along its length
I used the track saw to make cuts of various depths the provide guidance on how much stock to remove using the planer.

I put red lines on the bottom of the long slots to help show up the depth to remove.
My jackplane removed the planer marks and started to establish a flattish surface for the seat.

Once the top was more or less smooth I fitted each of the aluminum strips into their slot and
radiused them on the bandsaw to minimize the material I would need to remove.

The frets were epoxied in and the cocobolo dots inlaid before the sanding phase.

Using a shop-made sanding block I spent several hours removing high spots and getting the smooth top I needed.

Final sanding with the ROS up to 400 grit gave a glass smooth top and textured the
aluminum to a matte finish.

A few coats of my goto finish of Watco Danish Oil natural makes the figure in the maple pop.


Tuesday 16 August 2016

This is not just any plane hammer...

There is always a better way...


For much of my woodworking life I have always looked at tools in a critical way, and while sometimes they are just "perfect"; in my view many of them could be improved. While sometimes this involves simply replacing the pedestrian wood bits with something a little more exotic, other times it's a bit more involved than that.

Veritas Spokeshaves
I have customized some tools by replacing the wood with something which looks a bit better and really has no impact on the use of the tool. My Veritas spokesshaves have all had upgraded handles to make them easier to differentiate from one another. A buddy of mine agreed and I made him a set for his Boggs Spokeshaves. My Veritas PMV-11 chisel handles, while 100% the same physically, they are now Brazilian Rosewood - a choice fitting to the quality of these fine tools.

Veritas PMV-11 Bench Chisels

Other times while doing a "wood" upgrade I have changed the design to better suit my use for the tool. This is most apparent in the handle replacement I did for my Knew Concepts saws. A secondary industry had already started for fine wood handle replacements for these saws, except they more or less replicated the whitewood handle that was supplied with the saw. I felt the saw would be more easily used with a longer and heavier handle, I had my machinist buddy makes some brass fittings to my specs and turned some
I Knew I was onto something...
handles to fit them on and voila the saw is a completely different tool.

Friends of mine have really enjoyed this adaptation and continue to use these handles to this day.
The original 14!


My little hammer makes the big stage


Early Versions for friends
And now to the present. I have always appreciated nice hammers and while I have a few (<20) I never could find a small plane hammer I enjoyed using. At the time there were no turned brass head hammers on the market so I drew my inspiration elsewhere. I wanted a small hammer which put most of the weight in the head, so this meant a narrow and light handle with a brass head. Brass is soft enough to not damage most tools, but was still too hard for some things, so I threaded one end and turned nice wood heads to twist on so I could replace them when they break. At the time there were no small hammers being made in the market with round wooden heads so I experimented with a few designs and settled on a shortish length with a slightly beveled head. Several years on I am still happy with the design and not broken a single head yet.

I made a few of these hammers and gave most of them away to friends for their use. Little did I know where that would lead. A few of the guys I gave them to are well known toolmakers and they loved the design. In fact this became their go-to plane hammer almost immediately and others took notice at shows; the next thing you know we were talking to Robin Lee of Lee Valley fame about them being made by Veritas to sell. That was well over a year ago and I am very pleased that my little plane hammer is now in the Fall Woodworking Catalog from Lee Valley and is part of their regular product line going forward. This is a pretty big deal for me and something I am very proud of. Hopefully others will find my design useful and use them in their own shops.
Image Copyright - Lee Valley Tools


And it's not just a plane hammer...

Since the creation of this hammer, I have found it useful for many more things than adjusting my wood and metal bodied planes. This hammer is rarely off of my bench, a few of the uses I have found include:
  • I frequently use it as a small "persuader" for joinery, 
  • it's the perfect tool for tapping Dominoes or dowels into their slots with mushrooming them,
  • It is just hard enough to pound in copper nails without deforming the head on them,
  • Tapping in wooden plugs
  • more to come....


Friday 4 March 2016

Oneway Chuck Key Upgrade

A couple years ago I made a substantial upgrade my main shop lathe to a Oneway 1640, which is a wonderful piece of kit. There is very little to complain about with this unit, however I have found the need to upgrade a couple of things. I added a wheel to the headstock to make it easier to turn the headstock manually. There is a picture of that wheel in the blog entry linked to above.

I have a number of the Oneway Stronghold chucks for various jaw sizes, and the chuck key which is shipped with these has given me no end of frustration. As you can see in the picture (right), there is a sliding cross piece, more or less held in place by those red plastic nubbies. I say more or less because they seem to fall off pretty regularly and the handle slides out, usually at the most inopportune time. And yes I could have glued or taped them on, but if you read my blog or know me - that's not happening!

I took a picture of the handle on the banjo and gave the  chuck key to my machinist buddy Joey and just said improve on this. I thought he would turn me a new handle and replace the metal rod - not Joey! Although this looks like what he did, it is much more robust than a simple brass turned handle.

He drilled out two pieces of brass to accommodate the metal rod, turned the two handle sides and used an arbor press to insert the steel rod into the two brass handle parts. This makes a handle that looks like brass but has all the strength of steel. This handle is also comfortable and is never going to fall out again.

Thanks again Joey!


Monday 15 February 2016

2016 in like a lion...

Like many of my woodworking compatriots I have adopted the use of Instagram to share the happenings in my shop. As a result my blog posts have diminished. I am determined to keep this running log of major activities, so this will serve as a an update on what I have been up to.

Click on any of the pictures to see them a bit bigger.

The end of 2015 brought to a closure my foray into the luthierie, I sold all my guitar making tools, jigs, plans, hardware, and bits to a friend who is starting up his own guitar shop in Dartmouth; I hope this gives him the head start he needs. He will also finish up a few projects I never completed which will close the door on this part of my woodworking experience. Having made 10 guitars and mandolins over a few years was both eye-opening and very rewarding. Nothing will take your woodworking to a level of precision like the technical demands of building a guitar. My archtop guitar remains the project I am most proud of to date - I will have to work pretty hard to surpass that accomplishment. BTW - I have kept all my premium wood sets, so if you are looking to build a guitar or two, come see me...

The off-time during Christmas was consumed with some painting around the house, and the pumpkin orange in the hallway has been muted to a cream off-white. Your retinas will thank you.


Update on Christmas build...

How do you do siding in bird-scale?
Tilted dado blade and voila!
As part of tradition at Christmas my wife's family draws names, this is a merciful way to deal with all the giving nonsense. Her sister wanted a birdhouse she could put out front. It was determined I would replicate her house (more or less) in bird scale. This was a fun project using up some cedar I have been storing for far too long.

The finished birdhouse "in the white"
The finished bird condo, after receiving the full Kim treatment - awesome!


Shop Clean-up and some turning:

We needed some cutting boards she said...
I have been doing quite a bit of shop cleanup and moving out more scraps to the burn box to get some of the clutter out of the way. As always many of the pieces are just a little too big or premium to burn, so these get either stored back away or turned into something. This time they made their way into some cutting boards, these are all offcuts and I thicknessed a few strip to inlay them to add some interest:


Is this enough already?
I started this rolling pin a couple years ago and was fed
up with it rolling off the bench. It has skateboard
bearings inside to make it easy to roll.
I rough-turned this wet piece of Olive last August
and finally it was dry enough to finish off (smells bad).


As you see I have been working through lots of pieces of material, although it does not appear to have made much of a dent.

I will have to re-dedicate myself in the coming months to this purpose - fail, I shall not...

This piece of punky apple came from Yarmouth in 1999!
This round piece of Maple had 1996 written
on the edge - c'mon man!


Another project from the material stores...

I have also been busy on a piece of furniture - this time for us. We wanted a sideboard for the dining area to replace a shelf that mysteriously disappeared after my youngest son bought his new house. I am not saying anything in particular here - the timing definitely was a coincidence.

The money shot - cherry and ash sideboard in its new home.
Size: 48" w x 16" d x 30" h

Those not interested in woodworking techniques and the man glitter that we all know sawdust is - click away now.


In keeping with the theme of this post this entire piece was built using material I had on hand. The cherry came from material I had left from the KUBISK bedroom set build, including the top which came from exactly three pieces 50" long to yield a 48" top. the ash is from material I had milled up for the KUBISK drawers.


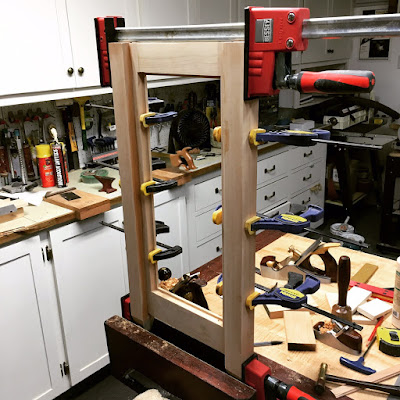
The end frames are glued up and make extensive use of dominoes for easy joinery.

The ash end panel looks like separate boards, but I chamfered the edges before gluing them up.
Expansion s[ace was left on the edges behind the strips holding them in place.


The structure comes from an integral shelf in the base screwed to the end frames
and web frames in the top providing structure for the drawers as well.
The shelf is veneered Baltic birch to provide max support.
The back is designed with individual cherry slats shiplapped and screwed to the back.
I wanted a finished look in case this became a free-standing piece.
And yes the screws are clocked!!


This unit has a couple of drawers and of course I am going to dovetail them.
I don't dovetail all the time - but when I do, I use the David Barron jig! :-)

All glued up with a coat of oil to seal.
Another shot with the drawer open and shelf installed. We chose the clean
drawer front look without hardware. drawers have a centre glide hidden underneath.