A place for me to display some of the varied projects that come out of my shop, as well as to "talk" about some of my experiences working with wood.

Wednesday 25 July 2012

Rocker Build Update

A lot of progress has been made since last week. The rocker has a back and the rockers are shaped, spent quite a bit of time tonight rough shaping the arms, have a look at the pictures for the latest.

The arm screwed into the back leg and glued to the transition block, lots of grinding remains to make this look like it should.  The top of the arm has been coved on the tablesaw.

This and the next shot are the first test fit of the rockers with the transition stacks glued on. Those stacks of lams nder each leg will be shaped to blend into the leg in the classic Maloof organic style.

Front view showing rocker angles and cove on top of arms.

Another example of where luthier tools have purpose in other areas of woodworking. This is my teflon bushing on my laminate router - this is normally used for routing binding on instrument bodies. In this application it raises the bit high enough to rout the back brace safely around the severe curve, which would not be possible in a normal table-mounted router.


Another test fit, the rocker transitions are now shaped and the rocker has been rounded on the router, once the back is attached  these will be screwed on and the joints smoothed so they disappear. You can also see the back braces have been fitted in to the seat. While sounding like a trivial thing, getting the back brace bottom tenons to the exact width was a tedious job requiring them to be dimensioned to +or- .001" - too small and they are firewood! Fortunately no real drama here.
The headrest has been screwed on for shaping, no glue yet, but with the back braces in the bottom holes you begin to get the overall look. The tops of the arms have been shaped a bit - time for a Heather fitting. Back Braces will be trimmed and fitted tomorrow and then after a bit more shaping the headrest will be glued on. All that's left is attaching the rockers and final shaping.

Once the final steps are complete, final shaping and sanding will likely take a couple of days, this will need to be sanded to 1000 grit all over in order to ave the necessary smoothness for an organic piece such a this.

Saturday 21 July 2012

Rocker Update - Finally starting to look like a Chair!

The past while has been spent working on the rocker, I  realized I was not done building jigs and fixtures but am finally onto building the rocker. Pictures below document the process -  as always click on the pics for higher resolution.

This is a test fit of the front leg in the recess in the seat. This is an example of the precision necessary,
this piece is being held in by friction alone.An example of the level of precision
necessary to build a Maloof rocker.


This fixture takes 10" long strips and tapers them from .060" to zero.
There is a .060" strip under the right edge (opposite hinge) and runs it through the Performax.
These strips are inserted in the back braces to make the ends thicker for the tenon which goes into the chair.

Here's a stack of the wedges ready to be inserted into back brace stacks, just another task
that takes gobs of time to produce one small element for this project.


The plan called for a fair curve for the side of the chair - why not use a guitar back brace which provides
 a nice 28" radius curve which looked just dandy!
A pair of back braces in the glue-up, 24 hours like this means 4
days to glue-up the BB's for the chair.

The eight back braces removed from gluing forms and the edges cleaned up ready for trimming.


This and the next pic show a router adaptation which allows me to rout the  legs.
The glue-block on the legs makes using the table-mounter router impossible, this
riser raises the bit high enough to allow the legs to be rounded over saving a lot of shaping.

Is it safe? This bit has 7/8" embedded in the collet, providing lots of security for routing operations.
This shows the riser attached to one of the router table inserts.
Here's the front legs complete, ready for gluing, notice those big pieces around the joint, they help with clamping
and are all ground away once the legs are attached.

Okay what the hell is this Octavious Prime thing?
Yet another jig, designed to hold the legs in exactly the right position to glue
on the block which join the legs to the underside of the arms. This piece will
be shaped to blend the leg into the arm.

A long overdue shop jig, a crosscut sled, which allows me to safely do these
types of cuts on the tablesaw. This shot shows a rear leg setup to cut the joint

Rear leg glue-up, two dry-fits and 10 minutes to get everything in the right spot. No adventures
and rehearsal ensured an uneventful step. Overnight like this.
Front leg glue-up, you can see the transition pieces glued into place where the arms will go.
Overnight like this.


After about four hours of grinding and shaping, the transitions have been smoothed. Heather says
it looks like the tree grew together, following are a few closeup shots of the front legs.


Closeup of seat to front leg transition area.

Front leg again.

Front leg again from the side, notice those blocks are all gone and  it looks like a leg now.

 Lots of work done, but starting to resemble a chair!!


Tuesday 10 July 2012

Rocking Chair Progress Update

Friends that know I am working on a rocker ask me about updates every now and then, so I thought I would do an update entry. I knew this would be a daunting project to start from the outset and I have not been disappointed. While I have quite a few bits done, many, many hours have been spent building more jigs and fixtures to start the build. Exactly like when I built my first guitar, actually building the guitar did not take a lot of time, getting ready took all the time - all that being said, subsequent guitars (and rockers, I hope) will be similar.

To update, I am making the rocker in a petite size for my LOML from cherry and the accent wood in the back braces will be some nice walnut, creating a very nice contrast.  If someone were to characterize my "style" with woodworking it would involve using the colours of the wood to "paint" a picture in the finished piece - like the chairs and stool projects for example. No stain or colour to hide the natural beauty of the material.

Below are a few pictures of progress to date, with a description on each picture. Just click the picture to see a larger version - enjoy the progress report.

The 6 pieces of the coopered headrest have been glued up
and cleaning up the edge with my Marcou smoother - end grain - no prob.
The finished headrest, cut to 1.25" thick and sanded to 120 grit, ready for fitting - just need a rocker to fit it to.
 Note the sapwood in the middle will tie into the sapwood joint in the same place on the seat. 

These 8 walnut strips will be the back brace fronts. They are sanded to 180 grit
and thicknessed to .080", notice the figure progresses across the
strips giving a nice effect - there are only 7 back braces, an extra in case of butchery.

The rockers themselves (the part that rocks on the floor) is made up of  9 pieces
of 1/8"s trips glued into shape. Here are 5 billets of cherry ready to be sliced into
rocker lams. Notice the marks and colour coding so I can reassemble them after cutting.

After cutting the strips on the bandsaw and thickness sanding them to .125",
they are put back together so I can build rockers ready to be glued up.
BTW - there are enough lams here for two rocking chairs. This was almost 6 hours work
to get from the last picture to this one.
Lots of clamps in the gluing form as well as the gluing support on the top
to avoid marking the rocker with the clamps.
Lots of glue, lots of mess and 24 full hours in the clamps and you get...
The first finished rocker removed from the form and the edges cleaned up on the jointer.
Notice the walnut strip inserted to provide an interesting contrast to tie into the walnut in the back braces.

My routing setup for the seat joint, block added to corner to avoid tearout. Hal Taylor likes to do the seat in a vertical position, I find this easier and safer for me. The results below are identical.

Here the seat joinery is complete, you can see the iconic Maloof joint for the back and front legs.
The unique shaped holes for the back braces are also routed in, the seat front profile
has been bandsawn. Ready for carving.


The seat rough carving is complete with the Kutzall on the angle grinder,
considering the plume cloud that this carving generates, I do it outside in the driveway
on a windy day. This was about 45 minutes of carving. Probably another couple of hours work before its a seat.


Another fixture which was a bit of a task, this will be used as a sled to put a cove on the top
of the chair's arms to save lots of carving.

This six degree jig will help to support a number of pieces both against the fence, like this
leg setup, and also in the crosscut sled, which is the next fixture to be built.

Sunday 1 July 2012

From Rocking Chair University to Rocking Chair R&D Department

Research Subject
In a previous post I mentioned I am setting out to build a Maloof style rocker. Some of the elements in this project require new techniques for me and I felt I needed to go back to school for some of them. The Maloof  rocker has many complex elements, and Hal Taylor's interpretation of this iconic piece of furniture has some novel techniques to make construction do-able for the normal woodworker.

As mentioned in a previous post I am building Scott Morrison's ultimate shop stool as a test bed for my new techniques. I have modified Scott's design to try out some techniques for the rocker. My modifications include coopering the seat back to try Hal's technique, carving the joint areas and legs to practice my shaping skills, in addition to the seat treatment. I also have never really done much with dados on the table saw,and the stool and rocker require precise dados for the joinery - time to bite the bullet and buy a quality dado set.

Carving a heavily sculpted seat


Carved seat for Stool, clamped on workmate outside.
Sawdust plume cloud not in the shop!!
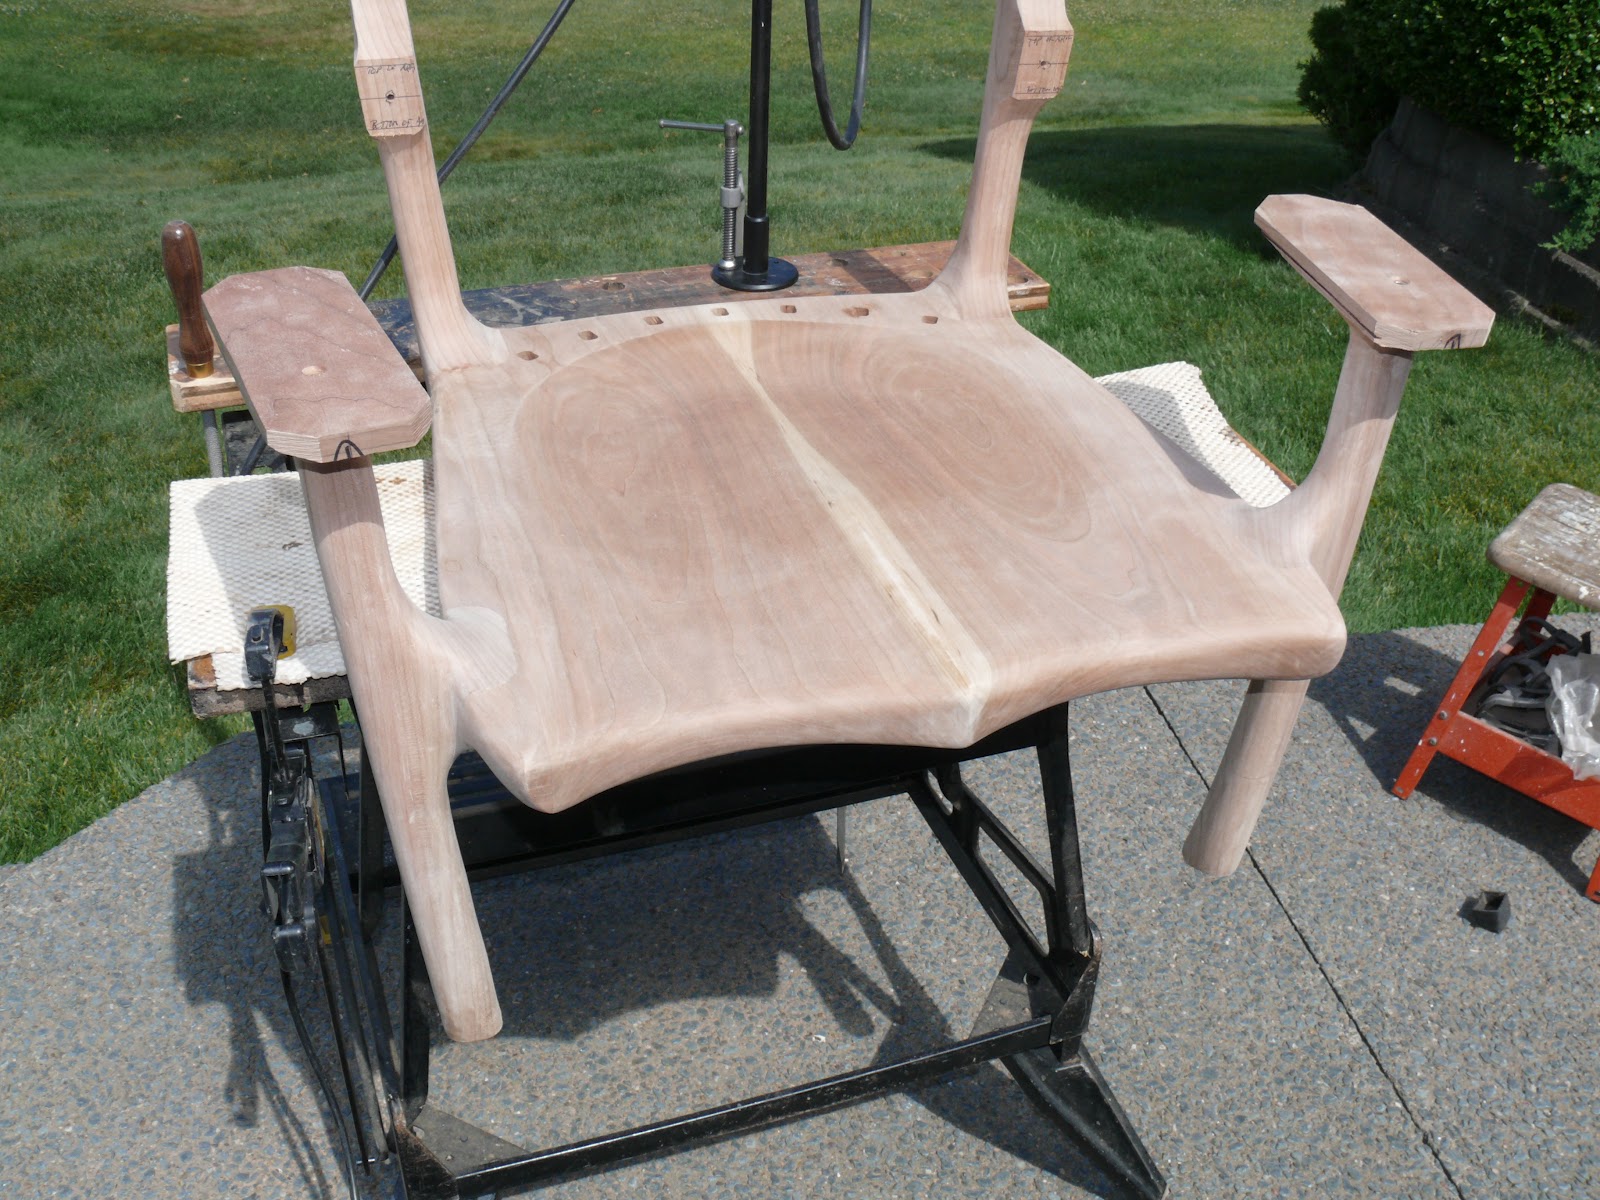
My dining room chairs have carved seats, however, the rocker requires considerable more material to be removed in the butt-cheeks part of the seat. This would make my manual carving technique with luthier planes very tedious and a nightmare - a long nightmare. I invested in a new angle grinder and bought a Kutzall wheel, which my reading (and YouTube research) told me would make short work of removing up to 7/8" of material from the seat. I also bought a backing wheel for sanding disks for the grinder and set about trying to make a seat.


Seat profile of the finished seat showing carved front section.
Scott's plan called for a square front as in the rough carve above, I wanted to try out the leg cutout and more heavily carved front of the seat which is typical of the Maloof tradition. 


Cutting Precise Dados on the Table Saw

Dado set and sled ready to cut some grooves
I have mostly cut dados using a rip blade on the table saw however this technique is tedious requiring many passes and takes a lot of effort to be accurate. Time to bring it up a notch!! I ordered the top of the line dado set for Lee Valley, made a few zero clearance insert plates for the saw, and made a dado sled for the stool legs.

Once setup and ready to make sawdust this set was a dream to use and made short work of the dados for the stool, I don't know why I took so long to get around to buying one of these.


Coopering the seat back

Using pinch dogs to assemble the four pieces for the seat back

My Marcou smoother made short work
 of trimming this cherry end grain.
The original plan for this stool called for  slab  backrest bandsawed to a concave shape and inserted in the stool. As I mentioned in my rocker post one of the elements I like the most about Hal Taylor's design is the coopered seat backrest, which makes the backrest grain vertical and allows it to flow from the seat itself. I used Hal's seat layout using the cherry's sapwood for the centre joint emphasizing the pommel, the sapwood is carried into the centre joint in the backrest as well - I really like this element.


Once the four pieces are assembled the curve is cut on the back and front on the bandsaw, lots of sanding later by hand and machine; and a lovely formed seat is ready to be mounted.


Dryfit with clamps and test fit for coopered seat back.

Carving and shaping of millwork


The rough cut lumber for this project is pretty chunky, the legs are square, the joints are square, it could do with some shaping. Using my many rasps and a bit of power sanding,as well as new carving burr for my Dremel, a lot of material went into sawdust making a much more refined and elegant look.


Carved transition arm support


One area the rocker that has a technically challenging joint to carve is where the arm attaches to the front leg, I wanted to try this out so modified the stool plans to use a built up block that would be carved to blend not the seat. In the rocker this transition block provides meat to bury a screw in for this joint, the stool does not need a screw there.


A much more organic look to this critical joint.


The other area which I thought needed some work was where the rear leg attached to the seat, the chunky joint needed some work. I tried out my new Kutzall carving burr here as it needed a concave area which rasps can't reach. Turned out okay I thought.


Rear leg/stretcher transition shaping.


The transition where the stretchers join the back legs needed some work, so some power grinding and lots of hand sanding later made this joint flow...


Time to build a rocker

With the necessary R&D complete, its time begin my rocker building adventure. I have all the bending forms built and ready to use; building this stool project has improved my confidence tremendously and I feel much better prepared for rocker work!