A place for me to display some of the varied projects that come out of my shop, as well as to "talk" about some of my experiences working with wood.

Monday 23 January 2012

Leminster #1 Finished!!!


A few folks have asked for an update on the chair, well here is the first one with a few posed shots, enjoy. this cherry will darken up nicely in the months and years to come.
High View showing seat and through tenon detail

Side view highlighting chamfer on front of seat making a very comfortable chair


Three-quarter front view - nice clean down under look - like a Ken doll.
 A couple of more build shots for those who asked...

Seat Carving - those luthier planes are good for more than just guitars.

The legs with brackets mortised, glued and screwed into leg, ready for trimming.

Friday 13 January 2012

Jigs Aplenty

I thought before I started this chair project that luthiers were the jig fanatics of the woodworking world, but chairmaking ranks right up there with the "best" of them.

This entry is focusing on some of the jigs I have put together to help chair replication. if I were building one chair, I would be done by now, (hmmmm) but in order to make the chair set more or less identical, a jig would help in the repeatability of the steps and help the chairs look more or less the same when complete. One thing I have learned from all the reading and youtube'g on this subject is to not get too caught up in each chair being an exact match of the others - if it looks fair, it is fair, a common refrain of chairbuilders. I learned this first hand whern I was doing the template take-offs for the chair seat; I thought I had done a pretty good job making the curves on the front the same, they were 3/8" different, something that could not be seen by eye - I guess it was "fair".


End of leg mortise jig showing
indexing strip for alignment
of wedge slot with leg mortise.

Router template in place to rout
leg mortise


Completed leg mortise - First one took 3 hours,
remaining 3 on jig took 15 minutes!!
For the undercarriage of the chair two jigs were required, one to mortise the leg and one to build the bentwood braces for the legs. The leg mortise jig is a box to hold the turned leg in position, without moving and to keep the mortise coplanar with the leg splay. the jig also had to ensure the leg mortise was in alignment with the wedge slot in the leg tenon. I laid this out so all the leg tenons in the top of the chair seat would point toward the centre (in an "X" shape).

 
Two jigs for rear and front leg leg angles.

The next jig required was one to laminate the bentwood leg brackets. These leg brackets are a staple of modern shaker chair/bench construction, I talked about them in the last blog, but wanted to highlight the jig and post a better picture than the phone pic I used earlier.

Since the front and rear legs splay from the cente axis at different angles, two different brackets are required for each chair - 2 for the front and 2 for the back.

Each bracket is 4-5 thin strips of ash cut to 9/16" wide and stacked to 1/2" high and bent around the form and held until the glue is dry with clamps - lots of clamps. Most of these strips were offcuts from the spindle and leg milling operations. 


Once removed from the form they are planed down to 1/2" wide to fit in the leg mortise and shaped  by hand to ease the edges and improve the look.

This picture is an upclose look (click on it to zoom) of the brackets in place on the prototype chair.

I currently have enough brackets glued up for 3 chairs - 4 to go!


Chair seat templates

The final jigs I needed before I could start making chairs were the templates for the seat profiles and shapes. Using plexiglas I laid out the top shape, the leg chamfer, the sides and front profiles from the prototype. This allowed me to refine the shapes for the rough work I did carving the prototype seat.


back to the shop!


Jig's to drill tenon holes through seat top -
One for each corner.


Spindle Update - this is 70 spindles
with tenons on both ends and turned
rough round - ready to be tapered and sanded.


Monday 9 January 2012

Leminster Chair Progressing!!

Since the prototype is more or less complete, I have been working through the massive amount of turning I have for the chairs. Even at 5 minutes apiece to turn a spindle, that’s still lots of hours at the lathe.

I have been working on the support brackets for underneath the chair. These are bent ash laminations which are shaped around a mold to conform to the angles of the front and back legs. This meant ripping the offcuts from the leg and spindle stock prep to lots and lots of 3/32” strips and cutting them to length to be bent and glued in the mold.

In addition I built a jig to rout the mortise iton the leg to receive the bent wood bracket. This was a complex exercise, the jig needed to hold the turned leg still while routing the ¼” deep and ½” wide by 6” groove in the round leg. This exercise took a morning to get to the point where I had one leg mortised, the great part was that it took 15 minutes to do the other 3!


Support brackets screwed in place on prototype


This picture shows the underside of the updated prototype chair with the curved brackets installed, they are screwed in place (not glued). On the finished chair these will be glued into the leg and the screw holes plugged and blended into the bracket. Even with the tenons not glued in the mortises, these brackets stiffen the chair up a lot more than before.


The side view of the chair shows the subtlety of this design, while adding very little visually, the structure is improved a lot. I like this clean down under look (like a Ken doll J) which to my eye is more interesting than a typical stretcher design. This approach is typical of the shaker style of chair and bench construction, and is one of the key shaker design features I have included in what is more or less Windsor style chair. I guess this makes sense because Leminster is 20 Km or so from my hometown of Windsor (NS) so it strays from the Windsor-style, but not too far!!
I only have two molds (one for each angle) for the bent laminations so can only do one chair set per day as it is necessary for the glue to dry hard(8 hours) before removing them or they will spring back to shape or weaken the glue joint. While these were gluing up I spent a bit of time at the bandsaw cutting the crest rails to final shape and rough cutting the seats to shape. The next step with these is sanding and hand-shaping each of the crest rails before drilling the spindle holes; the final machine step for the crest rail will be to rout a round over on the top face of the crest rail – this ill only be to remove the bulk of the material, as it will be hand-shaped once attached to the chair.

Six cherry and one walnut rough cut seats and crest rails.

I spent quite a bit of time shaping a plexiglass template for the seat, refining the curves on the front and back, as well as the final placement of the leg mortises. From using the prototype as a dining chair for a couple of weeks I saw a few subtle things I wanted to change in the final design. Next step for the seats will be final bandsawing to exact shape and cleaning up the outside shape to set up for mark-up before carving begins.

Tuesday 3 January 2012

Dulcitars fill in time when I get bored with turning.

One of the things I know about myself is that I can only do a redundant task for so long before needing a change. Turning chair spindles is one of those tasks,and while I am very pleased with my progress to date I need a couple of other projects to distract me from the mind-numbing hours of spindle turning.

The first of these projects is building a few strumsticks. I got a plan from Woodnet by Bill Wells which is a very simple project. Plans here.

I hve not built any instruments in a bit, so it gaves me a chance to re-acquaint my self with this craft. Not a lot of writing, let the pictures tell the story.

Squaring and cleaning up the body of the instrument from nice quartersawn maple.
 Nice Sauer & Steiner Panel Plane!
Four bodies with sides cut ready for insertion of end block. Very interesting construction with sliced sides opened up forming the body of the instrumnt.
End blocks inserted inserted into bodies and glued up. Neat how the sides are opened up to form the body.
A few cocobolo headstock overlays I had glued up,
 which will make a nice instrument back.
Some offcuts from guitar backs can be re-glued into bookmatched backs
 for the instruments, lets me use some stuff that has been sitting around for a long time.
Theese are koa, elm and walnut.

Smoothing the edges for the back and top with the Auriou rasp - a nice tool.


Completed instrument with rosewood fingerboard,
again used from sone old stock that has been sitting around for years.


Closeup of top showing a mini version of my logo.
These are cool!
Back to spindles. Next step for the instruments is to drill out the holes for tuning machines, fret the fingerboard and get it ready for finish - stay tuned, I will get bored again soon - this I know to be true.

Monday 2 January 2012

Leminster Chair Project in full swing!


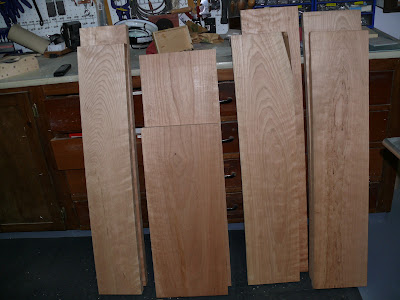
Nice selecion of cherry with chair seats hidden insde


With the chair prototype complete, it was time to mill up the lumber for the seat, legs and spindles. I bought some nice 2” cherry from Halifax Hardwood and let it acclimatize in the shop for a week before touching it. While it was getting comfortable in its new home, I milled up the ash which would become the legs and back spindles.


Since I am making 7 chairs, that’s 63 spindles and 28 legs, sure to challenge my attention span to complete, but I have the right attitude about the amount of time it will take and will ensure I have lots of projects to distract me and fill in those voids when I am ready to slit my wrists from hours (days) of turning. I am avoiding my natural tendency to rush to complete something which inevitably disappoints – telling folks this will take a few months helps me to avoid rushing.

Cherry Seat glue-up.
With all the ash milling complete it was time to tackle the cherry. I took more time grain and colour matching for each seat than I ever have done on a non-guitar project. Using my new Sauer Panel plane as a jointer plane to clean up machine marks made the tightest joint lines I have ever had. Each seat blank was carefully aligned and glued up in the clamps for a day each, ensuring no weakness whatsoever would be introduced into the glue joints. This was one week of one seat blank per day. During this time I was starting the production line setup to turn the spindles. Using the tenon cutter I put a ¾” diameter tenon on one end and a ½” tenon on the other end of 70 spindles. I made a few extra to deal with the inevitable turning disasters and to improve my colour matching potential later on.

Summary of work to date is all spindles tenon’d and about 50 turned round in prep for the final turning and tapering stage in the lathe. Seat blanks all glued up and the crest rails all cut out rough.

Lots of work left to do
I spent the morning yesterday making a jig for the seat’s outside shape, smoothing the corner profiles, finalizing the leg tenon locations and the spindle locations, which I have refined a bit to please the eye more. I also built a jig to ensure the crest rails are all identical and ease the final smoothing on the spindle sander with a guide wheel for the drill press.

 I cannot say enough about the approach of building a prototype first, this allowed me to work out design details and production details I could not have otherwise visualized. Where possible I definitely will use this approach going forward. While building the prototype I also built the drilling jigs for the spindle and leg holes, using them to drill the holes for the prototype. This proved the jig build and I expect the drilling phase to go quickly on the production chairs when the time comes.

Back to the lathe.


Benchtop Extension Complete

I know that I said shop version 2.0 was complete, so let’s call this version 2.1 will we?

When I built the new wall benches in November I only built 12 feet of benches to sit along 14 feet of wall, this was mostly because most of  the ash I got could only yield 6’ of usable length per piece. So I ended up with 2 – 6’ benches, with 2’ of wall space calling out to be fulfilled. My plan was to make a short wall-mounted section from the leftover ash while I was milling it up for the chair project. 
Well it’s done, the idea was to put a bit more finish on this section so I could use it for a sharpening area and the water would not bother it. It has about 5 coats of poly on it and seems to bead up the water quite well. It will be necessary to wipe up after I am done, but having the stones and honing jig readily accessibl,e ensures I will sharpen when I should, not when I HAVE to!

Laser Printer Logo Imprint
When this section was ready for finish I wanted to put my logo on it, so I tried for the first time the iron on the laser print trick. It worked okay, but the unevenness of the ash created a few voids, so I had to sketch in a few sections with a pencil, since it was a rough sketch anyway, it looked okay. I was pleased with the final result.


Sharpening Station

Since I was applying finish anyway, I decided to put another coat of ply on the entire 14’ of bench. This evened it up as there were a few sections of punkiness that the first 2 coats just soaked into. This new area has created an awesome work area, as with most shop improvements, I wonder how I got by without it!

New