A place for me to display some of the varied projects that come out of my shop, as well as to "talk" about some of my experiences working with wood.

Wednesday 30 November 2011

Homemade slatwall an improvement over pegboard.

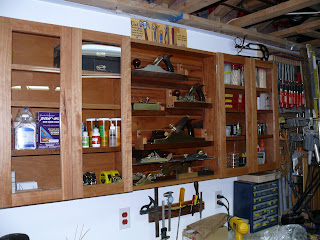
When I was building the wall storage cabinet recently, I wanted to incorporate a flexible exposed storage area for my planes. This would allow me to custom config the space to give me quick and ready access to whichever plane I wanted and a nice display option when they are not in use. Having used this setup for a few months I am very pleased with hoiw it has turned out. I am not a fan of keeping these everyday tools in a cabinet where they are more difficult to access (or see!)

One could always think pegboard as an option for this setup, however I was concerned with the weight of some of these planes as well as how the pegboard looks, well 'er like pegboard...


Home version of Guitar Store wall

I like slatwall as a wall storage option as it provides a flexible, strong and sometimes decorative wall treatment which provides ready access to the items stored on it. It is easily re-configured and there are many hardware options available at the retail level.

I did the usual web search for slatwall options for inspiration, let me tell you there was not much info out there to help me! Of course there were many slatwall options out there, some of which look really good, as well as tools and jigs to build it. However all of these are geared towards sheetgoods and larger format assemblies, mostly router-based bits that cut the slot for you. I was truly look for a homeshop remedy, so I had to design one from scratch for my use. The area I was working with was relatively small and I really wanted to use a nice material for the backdrop. I used commercial slatwall as a guide to ensure any hardware I bought would fit, so I started experimenting.

In keeping with my theme for using recycled material for this cabinet I used some leftover Tigerwood (Goncalo Alves) hardwood flooring as my slats. I started by ripping the tongues and grooves off the flooring to a finished width of 2-5/8". I removed the lacquer finish in the thickness sander, but did not reduce the thickness any more than I needed to in order to yield the depth I wanted, to avoid needing to make the lip too thin. Final thickness was 11/16" from 3/4" hardwood flooring.
   
Slatwall edge shot

After much experimenting (in pine) I settled on the following sizes for my slatwall pieces:
  • width of strips 2-5/8"
  • rabbet width - 1/2"
  • rabbet height - 1/2"
With the rabbet this size, it left a 3/16" lip which is pretty much what you need for the hardware to operate smoothly, going to 1/4" made some things too tight to sit properly and the space underneath provides clearance for the slatwall hardware when you are installing it. There is very little tolerance outside these dimensions. With the strips installed 3/8" apart all the commercial hardware I tested operated smoothly. The only real option one has is to reduce the width of strips to allow more strips per wall area, but I would not recommend going below 1-1/2" strips as you need enough material to attach to the wall and support the assembly. The rabbet size and inter-strip gap need to remain very close to these dimensions.

The next step was how to mount them, since I do not like my joinery to show, it needed to be hidden. My solution was a 1/2" plywood back cut to the opening size of the cabinet, with screws to attach the strips from behind. I cut a bunch of pine spacer strips to layout the slats on the backer board for several reasons: this allowed me ensure the strips worked out in a usable layout (not too close to bottom where slot was unusable, or close to the top where you could not insert the hangers) I had saved two strips that would be the top and bottom and cut them to width to fill the leftover gap. The other key reason for pre-layout was to allow me to draw lines on the backer board to show the exposed parts so I could finsh them before assembly. I transferred the gap lines to the edges of the plywood + 1/2" and joined them with a pencil after removing the slats. I was only using some poly here, but knew it would be difficult to finish after assembly. I also drilled two holes per slat through to the back of the plywood for reference later when it came time to screw the slats on. Then as Norm would say: "time for some assembly". Now trying to screw the slats on while keeping them lined up was going to be a challenge, so I dropped a bead of glue behind each strip, clamped them all in place and carefully flipped it over once the glue had dried. then it was a simple matter of predrilling my slats through the reference holes I drilled earlier and driving the screws.

The entire assembly was ripped to width  and inserted into the opening and screwed to the plywood cabinet backer. I inserted a couple of vertical filler strips planed to fit to hide the gaps and it was ready to go on the wall.

The planes are supported using some mounting shelves I had built many years ago which were screwed to the wall before. I had to modify them for slatwall installation and will write a future blog on this technique using store-bought metal hangers added to my shelves.

Very satisfying project, with the finished result a far nicer solution than commercial slatwall with all the flexibility and storage options this technology provides.

RDW

Tuesday 15 November 2011

Workshop ver 2.0 complete.

This entry is about a shop reorg, but before I start I wanted to share a story.
It’s a story about a man whom I have never met, I have only spoken to him on the phone. First I should step back to the beginning. I was reading Konrad Sauer’s blog about finding some special walnut from a Kijiji search, so I decided to do a search of my own. Sure enough, a search for lumber turned up an ad for a bunch of hardwood for sale not far from my home. I was thinking of building a couple of benches and was looking for some good wood at a modest cost. The price was modest, at $2/bf for ash, oak and maple this was what I was after. I sent in an email and got a response from a woman who was helping her brother out by clearing out his home and shop, and the wood was part of the inventory. She said her brother was pretty sick and might be able to meet me at the house to help me sort through it. I borrowed a buddy’s truck and drove to the address, a nice old home on the corner of two quiet streets, in a small town like many others I have come to know in this part of the world.
The sister and a family friend led me down through a little door into a basement workshop, (the owner was too sick to come) maybe 500 sq. feet (the entire basement) filled with lumber and very little workspace to do actual woodworking – but they had wood! I was having trouble finding what I was after so the sister called the brother on the mobile and he pointed me at the good stuff. There was a bit of teak, and some walnut, which I bought all of, I was after some ash to build some benches and he had a pile of it, both 1 and 2 inches thick. I thanked him for his help and sorted through the pile to get as much as I could fit in the truck for the drive home. On my way home I could not help but think about this family selling all the tools and material from a lifetime of woodworking and felt a connection to this man through our common craft. I had the wood he bought many years ago, no doubt with plans in mind and I was continuing that vision as one woodworking generation to another. When I got the wood home and stacked, I could not help but think about its previous owner and throughout the project feel the connection through the wood to another woodworking generation: while this wood cannot tell his story, he is as much part of its legacy as I am.
I ended up with about 160’ of ash, mostly 2”, planed it up to see what I had and proceeded to mill it up to make some benchtops. Since the wood was air-dried it had quite a bit of checking, so I worked around it to minimize the waste, using the shorter bits for legs and stretchers and had the material laid out for my projects. After all was said and done, there were a couple of boxes of kindling for my buddy and not much else.
Smoothing the legs til they look like glass, that Sauer A1 is amazing!
I was not building a proper workbench, more like work tables to go against the wall to replace a couple of salvage laminated work surfaces I had been using for 12-15 years. The tops would be 2” thick and 24”x72” in size, built to the work height of 34 inches these were to become the location for most of my project layout and assembly. I did not need another workbench as I have the dream bench I built over 20 years ago I cannot do without, these would be just tables.
After lots of gluing and hernia-inducing lumber moves the tops were done, and the base built using traditional trestle bench design giving a solid foundation for many years of woodworking. Of course any shop reno is not straight-forward, not only did I need to unload the benches and find a temporary place for the riggings, I needed to paint the floor underneath (left over from workshop ver. 1.5 reno) and paint the wall behind which was necessary since I would likely not have access to them again for many years. I have been doing some work on these benches since they were finished and they are exactly what I was after; but I still cannot look at them without thinking of the wood’s previous owner, and that someday another woodworking generation will likely come to cherish the previous generations’ contributions as much as I do. Thanks Harry!


The finished work benches line the shop wall.


Planes get upgraded Storage


Plane/Tool Storage before upgrade.

As part of the ongoing workshop 2.0 project, it was time to upgrade my exisiting plane storage.  I had picked up a couple of new planes and either needed to build some new holders or breakdown and build a proper cabinet.

Now was the time to build the cabinet that would provide a nice plane display and increase the storage near the bench at the same time.
In Progress
I decided to make the cabinet out of cherry, since I was trying to use up that last piece of cherry tabletop from our old dining table I had made 20 years ago. the rest of the cherry  had gone into a coffee table for Brendan and a couple other small projects. Other than the top and bottom pieces, this is all recyled material. the cabinet is 6' long to span the complete length of the table underneath and 6" deep. The cabinet is deep enough to  serve its purpose without interfering with the benchtop work area.


Slatwall plane storage/display area

The Centre section of the cabinet is a section of open slatwall. The slatwall is made from leftover Tigerwood from my office flooring project and is mounted to a piece of plywood underlay (also salvage) and inserted in the opening. I believe it does a nice job of holding the planes both for esthetics and access.

I re-worked my plane shelves which were screwed to the wall, by attaching metal slatwall clips to the back which allows me to re-configure as necessary.


The finished cabinet with doors attached provides plenty of storage and keeps my planes right where I can reach them. I am very pleased with the result!

Ta Da