I have not made an instrument for a while, and some would say I have not built one this time either...
 |
| Squaring up the strumstick blanks |
On the Woodnet Forum a while ago there was a post about building a Dulcitar or sometimes called strumstick. I said it would be cool to make a few of these for some fun. Not too much work, but a chance to hone the luthier skills for a change. I read the plans through to get the dimensions and then put them away to build them using my own techniques. This is a common approach to work for me as I have my own techniques I prefer and like to make anything I build my own. This was no exception. So I proceeded to mill up some quarter-sawn maple into blanks that would become strumsticks.
 |
| Four blanks with sides cut to form body. |
These are simple instruments to build, cutting a 1/8" strip on each side of the blanks to form the body sides is an elegant solution to creating the body.
 |
| Gluing in the end cap for the body. |
A little walnut wedge inserted in the end splits the body sides and forms the body of this cool little instrument.
 |
| Rasping off the flash on the sides. |
I recycled some left over spruce for the top and offcuts from leftover guitar backs to complete the body. The edges are trimmed flush with a rasp.
 |
| Cutting fret slots in rosewood bridge |
 |
| Filing the fret slots to make the fret pop in cleaner. |
 |
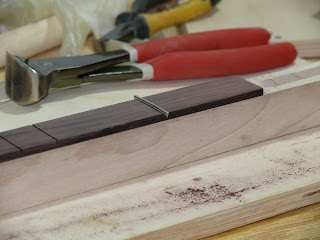
| Fret wire pounded in |
I resawed a rosewood fingerboard that came from the Martin factory in the 50's, thickness sanded it to just over an 1/8" and glued it on the body. The plans called for the frets to be let into the maple body directly, like an old strat, but I think this makes it look much more like a guitar.
I am often asking about fretting, the part I like the least, tedious and detailed, if not don't exactly right, the instrument is unplayable. The slots are cut in the figeboard, the slot is chamfered to eliminate tearout.
The frets are pounded in and trimmed close. The final shapng is done with a file to blend them into the side.
 |
| Fret wire trimmed ready for filing |
The strumstick has a diatonic scale so every note is a whole note, but more importantly there are less frets to pound in.
 |
| Drilling holes in the tuners to fit the slotted headstock. |
Time for some hardware, build a bridge and nut, I like to use water buffalo bone for nut material as its black and I like the look. I also inlayed a small piece of ebony into the tail for the stringbreak to protect the body.
Five or six coats of satin urethane and its tough as nails.
A few shots of the finished product
 |
| The completed product, strung up, bridge intonated and ready to play. |
 |
| The back, the walnut in this one is offcuts from the back wood used in the very first guitar I have ever made. |
 |
| Of course I had to install my guitar label - FYI this is about 5/8" square. Personalized for the recipient. |
 |
| The headstock with an initial inlaid for a lucky young man. |
This makes a fun instrument to play, and puts out an amazing amount of sound for such a small body. Having a diatonic scale makes it very easy to play for anyone.
I have only been following your blog for a short time, but it is great.
ReplyDeleteThe really nice photography and concise explanations on what you are doing helps with understanding your procedures.
Thank you sharing your talent.
I've been going back through your posts and enjoy them a lot.
Eric
Kissimmee, Florida
Thanks Eric,
ReplyDeleteSometimes I wonder if I get too wordy, but I try to say what I would need to know if I were the reader.
Thanks for the kind words.
Rich