A place for me to display some of the varied projects that come out of my shop, as well as to "talk" about some of my experiences working with wood.

Tuesday, 22 January 2013

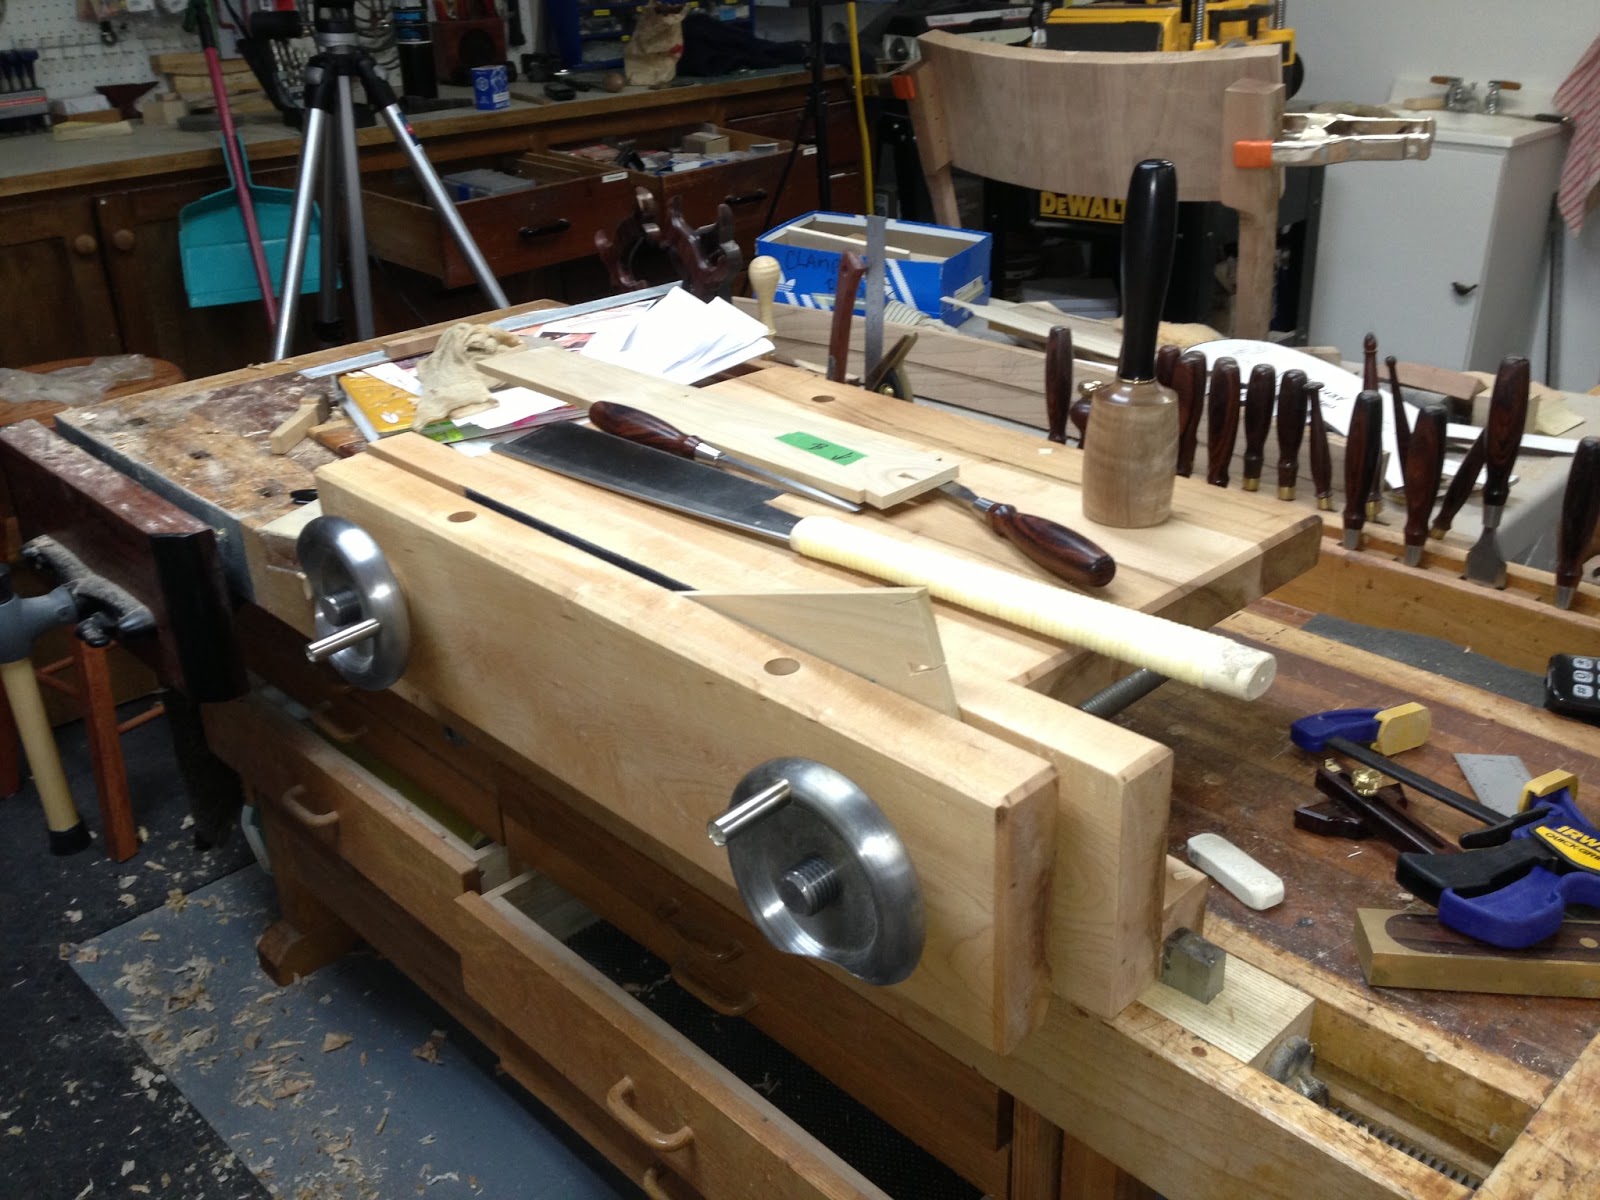
Hand Tool Bench-on-Bench (aka Moxon Vise)

During the building of my Toolchest, I spent quite a bit of time hunched over the bench paring out dovetails that I had cut. The next day I could not bend my neck and knew I had to fix this before I did my next hand tool project.

Moxon's engraving showing vise on front of workbench.
Many builders have played with the design of the Moxon vise which by most accounts was first found in Joseph' Moxon's landmark book on woodworking from 1678.

The recent renaissance of hand tool interest has resuscitated interest in the Moxon vise and many woodworkers and manufacturers have taken a stab at their interpretation of the Moxon vise.


I have looked at most of the designs out there as well as the many individual attempts at building this vise and developed a design that would work for me. I knew I wanted to use my end vise dogs to attach it to the bench and I wanted a small bench-on-bench work-surface, rather than just the two jaws like many designs. I asked my machinist pal Joey to use the same design he used for my end vise handle to make some wheels which would work with some threaded rod that I would build into the vise.

Wood Parts Layout before final assembly


I also built a mock-up with some blocks to test the height which would be best for me; I had read the the ideal height for this work is 4" below your elbow; after trying several heights it turned out the 3-3/4" below my elbow was the perfect height - the rule of thumb would likely have been fine!

Gluing the bench-on-bench "top" piece
Picture of vise in use making some drawer sides with prototype wheels.


I used some Maple that I got from the same mill as the birds eye for my Dad's rocker and built the various components to build the vise. The picture below shows the finished vise. A few test cuts on the new bench have proven its going to be very useful going forward. Since I have already been asked, these wheels are turned from 5" 4140 steel bar stock and are very heavy.

After using the vise on a couple of projects, one thing that has frustrated me is the the chop(front jaw) does not move when I remove pressure from the vise - I am looking for a small spring set-up which will open the jaws for me.


The finished Moxon.

Wednesday, 9 January 2013

NBSS / Tommy MacDonald Tool Chest Complete! Plus Tool Porn

Thanks to many for the kind comments (including a FaceBook share from Tommy himself) on my first post on the Tool Chest; I am glad others are interested in this project, it inspires me to keep going with this blogging thing...

The first blog left off with the case finished and ready for some drawers. The next step involved my very first attempt at half-bind dovetails which have been a trademark of fine craftsmen for centuries. The drawer bodies are made from Southern Yellow Poplar which is harder than the pine normally used but still soft and light enough to work easily. The drawer bottoms are 3/8" bookmatched resawn poplar with tapered edges to fit in the groove but keep the strength in a drawer that large.

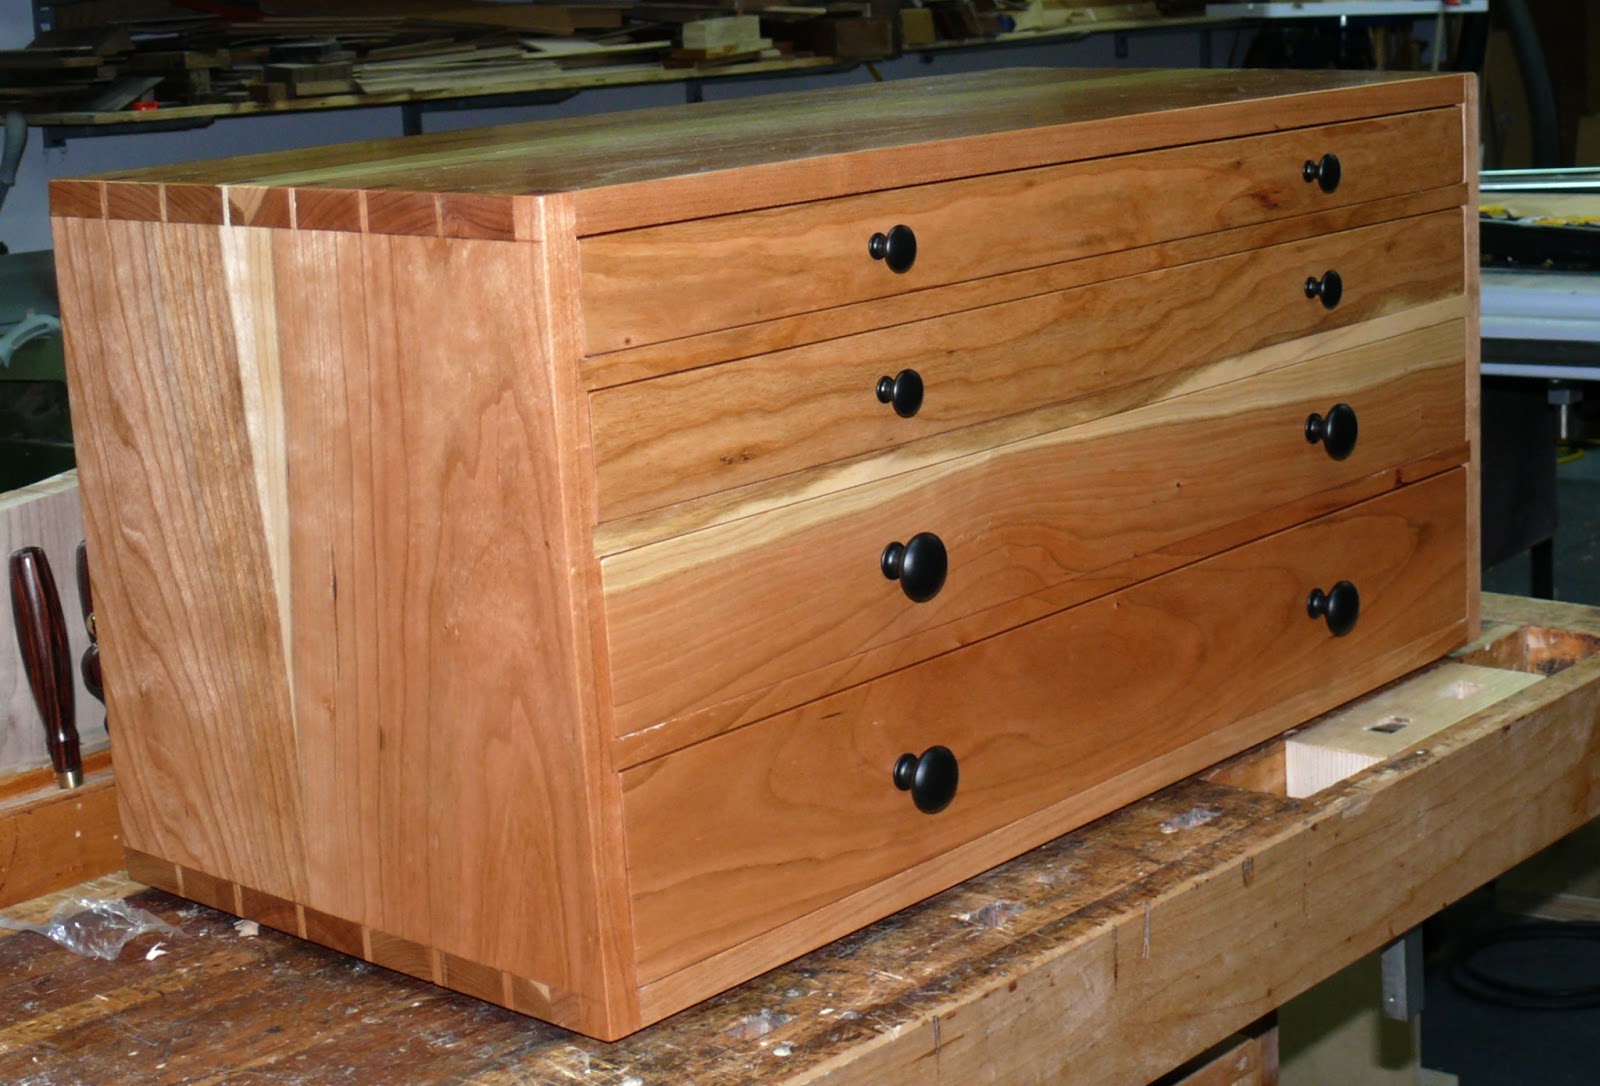
A few finishing touches I have put into this special project are the black cast iron pulls and the green leather drawer lining which add a real richness to the piece. Enjoy the build shots.

Using my David Barron dovetail gauge to cut the drawer sides.

Test fitting the drawers to ensure they glide effortlessly


The drawers with a coat of finish on them, the insides
are not finished.


The finished case and darwers, just 5 more coats of Deft natural to go.

The ash ship-lapped back is screwed on
The finished cabinet with cast iron pulls installed!

 And now for some Tool Porn

This new tool chest allows me to store some of my nicer tools in a dust-free place - they will all be used just as much, only without the dust!!
Measure three times, cut once, measure again!

The plane truth!

Saws - all??

A plane brown wrapper!
Thanks for viewing, this has been a fun project for me.

Sunday, 6 January 2013

Tommy MacDonald inspired toolchest - Build Part 1

I have been a big fan of Tommy MacDonald since he hit PBS 3 years ago, and fully support him in carrying the torch for Norm as the promoter of all things wood on PBS for the current generation.  I have to admit that Norm inspired me to get into woodworking many years ago, long before I had the tools and the space to make anything.

Tommy and his Toolchest
I had the occasion to meet Tommy this fall at Woodworking in America and had a chance to chat about his show; he also did a little demo/chat on his  toolchest project which appeared in this season's episodes. This toolchest however has been one of his signature pieces from the beginning and the build along for the original has been on his site from the beginning. I have always wanted to build this project as I think it is important for every serious woodworker to build a toolchest sometime in their lifetime. This design features many elements which make it a challenge for even the most experienced wood butcher.


Wood layout, couple of nice pieces of Cherry need to be
oriented to maximize the nice sapwood stripe in the joint
This project is my first real attempt at dovetails for case construction and like most folks a little intimidating, and unlike others, I am not going to use a lot of time practicing cutting dovetails on firewood - my approach is to dig right in. I used David Barron's dovetail jig which I have to admit is the best jig I have tried for cutting dovetails and is difficult, even for me, to screw up.


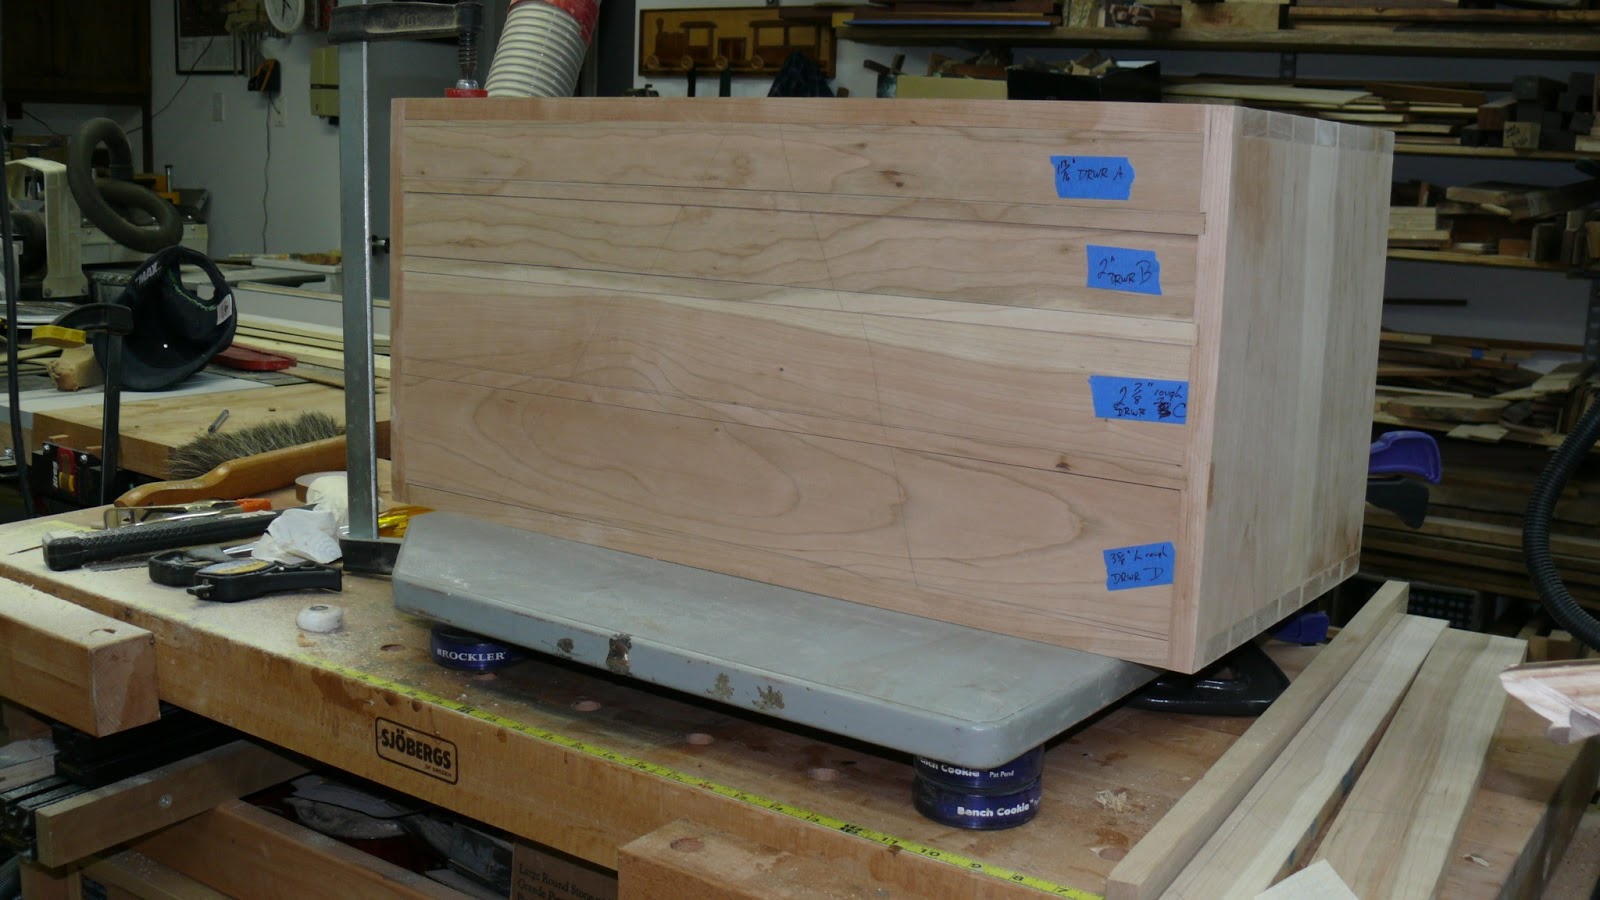
My design has a few departures from Tommy's original, because of a screw-up (insert swearing here) the front divider strips are not dovetailed into the front of the case - the dadoes look just fine - really they do...  I  have also altered the drawer layout to give me full-width drawers on the top, this better suits the things I want to store in this chest.

Following are a few pictures from the build, the case is now complete and just need to finish cutting the drawers and fitting them which takes quite a bit of time - test-fit, plane, test-fit again, repeat as necessary. Remember to click on the pictures for a closer look.


All the tails cut on the case sides


Using David Barron Jig to cut the tails on the case top

Test fit of the first corner - doesn't suck!


Case sides with dadoes cut for interior partitions, cleaned up
with the router plane
Mother of all glue-ups to ensure its perfectly square

I am testing out a prototype joinery float from Liogier rasps from
France, it makes quick work of the these faces right off the
table saw.

The interior dividers all ready for glue-up, I used oak for these
as I had quite a bit laying around.
Layout of the front pieces was critical to get that grain
flowing across the two boards. the narrow pieces are the
divider pieces that fit between the drawers.
The dividers test fit with cherry fronts added, ready for trimming.

The front dividers glued in place and the drawers fronts
 friction fit into their openings creates a pleasing look.


The case with a coat of finish on it ready for some drawers! the case is on its back, the long
face is the case's top.

Thursday, 20 December 2012

Rocker #2 - a most Special Build

I knew when I built my first rocker it would not be my last, its just a question of how long my attention span lasts before I need to move onto some other type of woodworking challenge - me thinks the next stage will involve carving - but that's another day.

This story starts with a challenge to my Dad to find me some nice hardwood from his childhood homeland, I told him I wanted to build a piece of furniture from it - not a lie, but misleading nonetheless - but for a good purpose!!

If you want to know where this is click here

Well between his brother Paul and himself he talked to a family friend who had a mill nearby and he thought he had "some of that birdeye maple", so the adventure began. Dad tracked him down and the visit was booked, we drove down and into the mill located in the middle of the woods. Sure enough it was there stuffed in the rafters of an outdoor mill for what I found out later was 20 years. As was typical for this part of the world, we spent an hour at the mill figuring out what I would take, all without the owner being around. Once I decided what I wanted, we drove out of the woods and over to the farm were he was working some cattle to negotiate the deal - he was very happy to take $2/bf for the wood which was a smoking deal, but I was not sure of the quality considering how long the wood has sat around and also how tough it was to grade the Birdseye in the rough - I would not be disappointed.

Dad organized his other brother's (not Darrell) truck and brought it down to the house. Thew wood was only air dried so it needed some time to dry out. This gave me time to build a couple of pieces from the Oak we got from the same brother into a couple of pieces of furniture, one for Brendan and one for Dad.

OK - back to this story....

All along my plan was to build a rocker for my Dad from the wood that was grown near his homestead - I could not have dreamed in my wildest fantasy this would be the result. While the pictures are very good quality, they cannot begin to do justice to how awesome this piece looks in the flesh. The creamy whiteness of the maple and the eyes just seem to pop off the chair and the mineral streaking only adds character, as much as I tried to avoid it. Here's the money shots: (as always click on the picture for the high-res close-up look)

Overall View, all Maple from this angle
Side View. The plugs and the accent strips
are Cherry which will darken up

Back View, the back braces are Cherry backed, not the grain
progression across the pieces. also see where the wood's figure
was not everywhere so i had to be strategic where I put the mineral
streaking.

Back Brace Detail

Seat and arms in all their Birdseye glory

Another detail shot


There was not quite enough of the good stuff to build a complete rocker, so I had to add a couple of pieces to beef out the legs so I could makes them from the narrow boards. Also the material was not quite 2" thick which makes it tough to get the thickness one needs for certain parts. All in all, I am more than pleased, and so its its happy new owner...


The happy Recipient!


Tuesday, 18 December 2012

Couple of small projects

Needed to fit a few small jobs between the big Christmas present build which will be revealed in a couple of days when it it presented to its unsuspecting recipient.

I needed a place to store my new Harold & Saxon chisels as these will be used for only special tasks and stored in the drawer for the rest of the time. I threw these two boxes together in an afternoon which I hope does justice to the fineness of these tools.

Couple of boxes from Walnut, Birdseye Maple and Cherry veneer over the BB plywood base.
 Keeps them where they belong.


Heather also asked me to turn a few Christmas ornaments for her staff so I used the popular birdhouse ornament look to turn a few of these out on Saturday morning.


Birdseye Maple birdhouses with Cherry and Walnut caps, kind of went for the acorn shape.

NOW BACK TO THE BIG PROJECT.

Friday, 14 December 2012

Bench Vise Upgrade

I built my workbench over 20 years ago as one of my first real woodworking projects. It is what is known as a European style with a face vise and end vise with sliding dog block.There is lots of talk today about different types of benches, but this is the original and still my all-time favourite design.
I have never been one to jump on the trend bandwagon just because everyone is talking about it.

heavily cropped shot of original end vise handle


I had been tossing back and forth a few ideas with my machinist buddy and wanted a better solution for the end vise than the old style wooden handle I had replaced 3 or 4 times over the years. When the vise was being used the handle was constantly in the way with the wooden part in the wrong place, if you know what I'm saying.


We were talking about wheel design for a Moxon vise (more on that in another post), and I thought a wheel would be great for the end vise, the challenge was the apron is only 3 1/2" high and the post is centred which means a wheel of any size would protrude above the bench and interfere with its use. To solve this problem we flattened one of the edges and when the vise is not in use it hangs out of the way.
View showing relief cut in handle to clear material on bench top when
not in use.


Vise wheel with cocobolo knob from an old plane.


I also added a knob to the metal sleeve on the new wheel to make it easier to turn, this was a knob I had lying around for years, I think it was an extra sent to me by Lie-Nielsen to upgrade a plane. Glad to finally put it to good use.

This makes the vise much easier to use now, don't know why I did not do this 10 years ago.


The new sliding dog to replace the one that had split.
Needs a few battle scars - maybe I better rub a little stain on it!

At the same time as this was disassembled for the handle upgrade I built a new dog block, the old one had split along one of the joint lines as it was built from a glueup. This time around I used a solid piece of ash which should be stronger than the last piece and will likely be usable for the next user of this bench when I am done with it.


The other thing that I laugh at with the whole bench craze nowadays is the guys who need to keep their bench looking like new, and re-surface (plane) it regularly to keep it so. Hey guys its a WORK-bench, what's wrong with it showing that it has been used for the intended purpose?  My bench has remnants from almost every project ever built on it and that's what makes it a treasure.

I was visiting the kitchens at Chateau Chenonceau on the river Cher in France last year and the chef's bench had a big "swayback" depression in the middle from hundreds of years of butchering. Now that bench had a story to tell...that's what I'm after.


Wednesday, 12 December 2012

Archtop Guitar gets new attention

This archtop was built a few years ago, but a recent run-in at WIA with Chuck Brock of Rocking Chair fame and the Highland Woodworker show. Chuck interviewed me and it made the show, this was cool. I was wearing my Benedetto golf shirt and Chuck asked me about Bob Benedetto regarding an interview for the show. I felt Bob would be a great interview so I contacted him on Chuck's behalf. While Bob is not a friend, we did exchange a few emails when I was looking for help when building my archtop from his book. Bob was keen and it seems like we should be seeing him in the future episode of The Highland Woodworker.

My proudest build ever.
I retrieved the archtop and had my son shoot a current picture for submission to Chuck and he used it in this same episode of the show - very cool.

 This guitar is built from Bob Benedetto's plans and book, however the front styling is inspired by his 35th Anniversary Guitar and Bob helped with some of the execution.


Detail Shot of Archtop


The guitar is made from the best of materials from LMI, Carpathian spruce and German Flamed maple, the same materials, from the region that Stradavari used 300 years ago.

Click on the picture for closer look.

Hope you enjoy it.


Wednesday, 28 November 2012

Harold & Saxon Chisel order has arrived

Today was a good day for my shop, as I was lucky enough to receive my order of chisels from Trent Powrie from Harold and Saxon in Australia. These are simply stated the best chisels being made today, using only the top grade M2 steel fitted with some of the finest wood choices and finish details available.

The fun part of this was that I had asked Trent to make these from something unique that no one else has and the choice was a surprise until they arrived today - I was not disappointed - he done good!

I ordered these chisels when there was still snow on the ground last year and have been monitoring their progress closely as they came together. The chisel set is the full range of bench chisels executed in rippled Australian Blackwood acacia melanoxylon which is stunning in appearance, matched with the gold-plated ferrules these are going to be a pleasure to use.
Harold & Saxon Rippled Blackwood Chisel Set


Every review I have read about these chisels gushes with enthusiasm and my quick tryout in the shop tonight is 100% consistent with that view. These are substantially larger than my Blue Spruce set and will be reserved for those projects where the highest level of precision is demanded.


The second set I ordered from Trent is a set of mortise chisels. I do not own a set of mortise chisels and have been thinking of buying a set for quite a while - I'm glad I waited as these are something else.
Harold & Saxon Desert Rosewood Mortise Chisel Set


These mortise chisels are made from Desert Rosewood alectryon oleifolius which is another nice uniquely Australian hardwood, these are quite heavy and will take quite a bit of bashing from the mallet, I look forward to a project I am starting very soon which will put these to the test.

Back to the shop.

RDW

Saturday, 10 November 2012

The Cutting Crew

Just a short post, now that I am back from WIA, after meeting many folks I have only known online for a long time. The show was great, wish there had been a few more hand tool makers, but them's the breaks.

Getting back into the building mode while working on the bathroom reno a bit every day.

Here's a quick project I just finished, it's a Japanese Damascus steel paring knife. I bought a few of these for Christmas presents and made one for myself to work out the kinks, this one is from a piece of Desert ironwood a friend gave me a while ago, finally a project to do justice to this wood.

Damascus steel Desert ironwood Paring Knife
Other side
Last year I made my first knives, some Outback style steak knives for my boys:
Last year's knife making experience - my first go at it.

Thursday, 1 November 2012

WIA here I come

I am preparing to head to Woodworking in America (WIA) tomorrow in Cincinnati, which is the Premiere woodworking event on this side of the pond. This will a chance to meet many of the online acquaintances I have built up over the years. This will also include many of the tool builders who have worked with me to build some of the nicest hand tools out there, I might even buy a thing or two...

I have not posted in a while, but this does not mean I have been idle. After finishing the oak table for my son, I built a similar table for my Dad from the same oak that came from near his childhood home - he loved it.

We are also doing a bathroom reno, so as those who have done these types of projects well know, this takes lots of time. I am doing doing most of the work myself, except the plumbing, electrical and tile, which I am subbing out.

Phase 1 - this is the framing for the new wall which will become the new bathroom wall
once the old one is removed. Half the work was re-working the hardwood floor pattern.

The new door (right) and hall closet framing to make room for the bathroom wall move.

Phase 2 - Now that the wall has been moved and the room next door finished, time to start destroying stuff in the old bath  which will be a complete gut, and the wall on the right removed to reveal the new wall behind it.


The before picture before Team Destructo showed up

Lots of dust as the drywall comes down, help from my two sons
 made this light duty and they had a ball destroying stuff
I avoided the heavy lifting!!

Starting to clean up from a dirty day - we removed 650 kilos of
material that got hauled to the dump.You can now see the new wall on the right
which makes the bath 15" wider.

The drywall installed - now the fun part begins with taping and sanding.
The recess for the mirror is roughed in.

This end will be a full walk-in shower with a couple
of niches and a seat - long ways to go.

Couldn't have a project without a woodworking aspect!!
Here's the vanity I made to replace the 20-something one.
Turned out pretty good, it's made from Teak.

Off to Cincinnati... can't wait!