A place for me to display some of the varied projects that come out of my shop, as well as to "talk" about some of my experiences working with wood.

Thursday, 25 August 2016

The Luthier is Out!

It's been a long while since I have done a project post due to a multitude of factors. I have been travelling extensively with minimal time at home over the past few months. Son#1 bought a house and needed my help on the few days I was home over that period, so the shop stayed more or less idle for a few weeks. The project featured in this post has been finished for a couple of months just waiting for some studio time to get some proper shots done.
My "Fretboard Bench" and Koa 000-14 #5

Instrument building phase complete Dave...

Probably more than 10 years ago, for a number of reasons, I chose to build a guitar. And as so often happens with my interests, it exploded into a full-on instrument building phase of my woodworking journey. When it was all over I had managed to complete 10 acoustic guitars, a Benedetto-style archtop, a couple of mandolins, and a few electric guitars and basses. Once this challenge was met and I felt I had achieved all I could with it, I stored my jigs and tools away to move back to furniture and other assorted undertakings.

The one key take-away I have from my instrument-building journey is that the level of precision and attention to detail necessary to build good instruments was well beyond where my skills were at the time. Today I have a better appreciation for what is necessary to do work at the quality that I can be proud of. I continue to tell my friends, if you want to take your woodworking to the next level, build an acoustic guitar, you will not be disappointed.

At the end of last year, I realized it was time to move out the dormant instrument building tools & jigs to make room in the shop. I got in touch with a young guy nearby who was starting up a luthiery business and we worked out a deal that worked for both of us, and I was officially out of the instrument-building business. I had given a few of the guitars I made to friends and family and kept the rest.

I did however, have one last music-inspired project I had planned to build and this Spring I made the move. I have not done a lot of mixed media projects in the past, but to achieve the effect I was after, I needed to do so. I chose aluminium as the metal of choice as it was easy to work with woodworking tools, it is lightweight and the colour worked for my purpose. The project was a bench which would look like the fretboard of  guitar. I had purchased the curly maple board for this purpose about three years ago and had been stepping over it ever since.

Fretboard Bench

The bench is made from soft curly Maple with aluminum "frets" and legs. Side dots and fret markers are Cocobolo.


The build of this was an interesting exercise as I had a very specific picture in my mind of the final product and needed help to achieve it. My buddy Joey the machinist would make the aluminium base and another friend in the metals business got me the aluminium strips for the "frets". Here's the studio shots of the finished project, followed by a few shop shots chronicling the build.


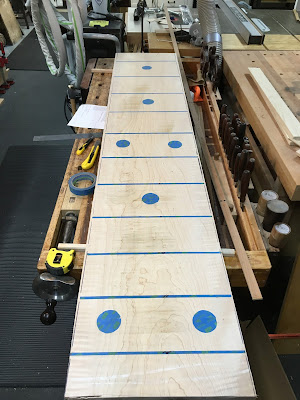
Working out the layout of the frets and dots. Using the width of the board as the base,
I extrapolated that to a scale length of 250" and chose a start of the 3rd fret so the 12th fret would fall within
the length of bench I wanted. The layout of the is shown as well.

And yes it must have side dots... and be tapered. I used my Festool track saw
and a shim to make two cuts to yield a 1/4" slot for the frets. It was much easier to line these
slots up while the edges were still parallel.

I wanted a simple design for the legs to minimise the distraction from the woodwork.
Here I am testing out the stability on some plywood to work out the leg spread.
These have a wider plate on the top which is screwed into the base.


Since this was to be true to the fretboard design I wanted to radius the top like the real thing.
A bit of a tradeoff between comfort and staying true to scale. I removed 1/2" at each edge to provide
a pleasant curve for the sitter and enough for the viewer to know it was radiused. After the board was tapered along its length
I used the track saw to make cuts of various depths the provide guidance on how much stock to remove using the planer.

I put red lines on the bottom of the long slots to help show up the depth to remove.
My jackplane removed the planer marks and started to establish a flattish surface for the seat.

Once the top was more or less smooth I fitted each of the aluminum strips into their slot and
radiused them on the bandsaw to minimize the material I would need to remove.

The frets were epoxied in and the cocobolo dots inlaid before the sanding phase.

Using a shop-made sanding block I spent several hours removing high spots and getting the smooth top I needed.

Final sanding with the ROS up to 400 grit gave a glass smooth top and textured the
aluminum to a matte finish.

A few coats of my goto finish of Watco Danish Oil natural makes the figure in the maple pop.


Tuesday, 16 August 2016

This is not just any plane hammer...

There is always a better way...


For much of my woodworking life I have always looked at tools in a critical way, and while sometimes they are just "perfect"; in my view many of them could be improved. While sometimes this involves simply replacing the pedestrian wood bits with something a little more exotic, other times it's a bit more involved than that.

Veritas Spokeshaves
I have customized some tools by replacing the wood with something which looks a bit better and really has no impact on the use of the tool. My Veritas spokesshaves have all had upgraded handles to make them easier to differentiate from one another. A buddy of mine agreed and I made him a set for his Boggs Spokeshaves. My Veritas PMV-11 chisel handles, while 100% the same physically, they are now Brazilian Rosewood - a choice fitting to the quality of these fine tools.

Veritas PMV-11 Bench Chisels

Other times while doing a "wood" upgrade I have changed the design to better suit my use for the tool. This is most apparent in the handle replacement I did for my Knew Concepts saws. A secondary industry had already started for fine wood handle replacements for these saws, except they more or less replicated the whitewood handle that was supplied with the saw. I felt the saw would be more easily used with a longer and heavier handle, I had my machinist buddy makes some brass fittings to my specs and turned some
I Knew I was onto something...
handles to fit them on and voila the saw is a completely different tool.

Friends of mine have really enjoyed this adaptation and continue to use these handles to this day.
The original 14!


My little hammer makes the big stage


Early Versions for friends
And now to the present. I have always appreciated nice hammers and while I have a few (<20) I never could find a small plane hammer I enjoyed using. At the time there were no turned brass head hammers on the market so I drew my inspiration elsewhere. I wanted a small hammer which put most of the weight in the head, so this meant a narrow and light handle with a brass head. Brass is soft enough to not damage most tools, but was still too hard for some things, so I threaded one end and turned nice wood heads to twist on so I could replace them when they break. At the time there were no small hammers being made in the market with round wooden heads so I experimented with a few designs and settled on a shortish length with a slightly beveled head. Several years on I am still happy with the design and not broken a single head yet.

I made a few of these hammers and gave most of them away to friends for their use. Little did I know where that would lead. A few of the guys I gave them to are well known toolmakers and they loved the design. In fact this became their go-to plane hammer almost immediately and others took notice at shows; the next thing you know we were talking to Robin Lee of Lee Valley fame about them being made by Veritas to sell. That was well over a year ago and I am very pleased that my little plane hammer is now in the Fall Woodworking Catalog from Lee Valley and is part of their regular product line going forward. This is a pretty big deal for me and something I am very proud of. Hopefully others will find my design useful and use them in their own shops.
Image Copyright - Lee Valley Tools


And it's not just a plane hammer...

Since the creation of this hammer, I have found it useful for many more things than adjusting my wood and metal bodied planes. This hammer is rarely off of my bench, a few of the uses I have found include:
  • I frequently use it as a small "persuader" for joinery, 
  • it's the perfect tool for tapping Dominoes or dowels into their slots with mushrooming them,
  • It is just hard enough to pound in copper nails without deforming the head on them,
  • Tapping in wooden plugs
  • more to come....