A place for me to display some of the varied projects that come out of my shop, as well as to "talk" about some of my experiences working with wood.

Monday, 26 December 2011

Leminster Chair is Born

Leminster Chair Prototype
After lots of carving and shaping, and re-shaping, and some more re-shaping I think I am close to a chair we can live with. The seat and the crest rail will be Cherry (like the bench) and the legs and spindles will be ash.

I have named the design as a tribute to the home of my Dad, a place that is not even a wide spot in the road.

The prototype is done in aspen and maple so a lot of the dramatic look is lost in the sea of white wood. In addition the legs will be reinforced with a curved ash bracket which will be mortised into the leg and screwed to the base of the seat. This chair has been in use for almost a week to test out the ergonomics and it is a hit with LOML and others so it is set!

Building this prototype was a real headscratcher with the geometry, in particular the back, with the angles and curve of the crest rail. Not having access to a chair that matches what I saw in my head meant several attempts to get the feel I was after. This ended up being extremely comfortable and a visually appealing look. I will likely chamfer or round the front top edge of the crest rail to bring the eye down a bit.

The cherry for the seats has been bought and is getting comfortable in the shop. It will get glued up into seat blanks this week. Meanwhile I have been milling the ash and have 80 ash spindle squares roughed out with enough leg blanks for 3 chairs so far - another trip to wood store for some more ash.

Time to build some chairs. I expect this to take a couple of months, so will post updates as major bits are completed.

Monday, 19 December 2011

Chair Making Project Begins

Now that my shop renovations and tool upgrades are completed (for now!) I have been contemplating a new long-term project to focus on, while filling in the gaps with small jobs and turnings as my attention span wanders.

I have been thinking about a new set of chairs to replace the ones we have been using forever - of course there is nothing wrong with them, so they will likely end up downloaded to one of the boys' apartments.

Shaker/Windsor bench in Cherry & Maple
 
I have been bouncing around design ideas for a while, but I knew I wanted to use a style I have used before in a bench I made many years ago. This Shaker/Windsor style bench of Cherry and Maple (above) combines the simplicity of the Shaker style of very little ornamentation, with the elegance of the Windsor-style chair with a clean spindle back. I like the clean look underneath, so wanted to make a chair without stretchers - this would take some work as the stretchers provide a lot of support underneath that will have to be replaced.


Design to Wood
I did a lot of research both online and in books on chair construction, and asked lots of questions. Since I had made a number of stools in the past I knew I was in for a geometry primer fit for one of my son's engineering courses. I quickly became schooled on the subtleties of leg splay, setback, offsets, compound angles and knew this would need a prototype build in order to avoid butchering some good material. Also, since I was making six of these, I would build the jigs as I went so I could ensure they would be identical (more or less) when they were finished.


Carving in Process

Carved Seat
I glued up a piece of Aspen and designed a seat, many iterations on paper resulted in this design which I transferred to the wood and cut to shape. I got out the trusty luthier planes and set about finding the shape of the seat, which I knew was hidden somewhere in that Aspen. This process involved a few discussions with my wife as we sat on it to determine if what I was coming up with was comfortable. This process is a lot like shaping an archtop guitar or mandolin so was very comfortable for me.
  
Hi-Tech Chair Prototyping Jig
With the seat shaped, I needed to determine the angles for legs and location of the tenons in the seat to make an overall look we were happy with. My complex clamping jig was to keep everything correct in three dimensions while I tried various locations and lengths for the legs. When we were happy with the look, I took off all the angles and measurements so I could build some drilling jigs and make some holes. This was easier than I thought, each of my test cuts on scrap was perfect the first time, so time to drill the seat. Now that this done, I will be able ensure all the seats have the same leg geometry and will be able to quickly do that part of the machining when the time comes.


Now to turn some legs!


Thursday, 15 December 2011

Sauer Plane Finds Loving Home

Sauer & Steiner SNo.4L in Desert Ironwood
Just back from another visit with the plane-building man-genius Konrad Sauer from Sauer & Steiner Toolworks; these visits are always fun to catch up on the latest projects, family and the general state of the woodworking world.


Front View


This time I picked up my new SNo.4L smoothing plane in Desert Ironwood. During my last visit we sorted through his collection of interesting woods and picked out a nice piece of figured Desert Ironwood; Konrad kept me updated with pics as he opened it up to reveal a stunning example of this wonderful material.

I continue to be amazed at the variations and unbelievable figure this wood reveals, Konrad's post here shows some other amazing examples here.

Rear View


Aside from a stunning looking tool, this baby works like a dream, like butter through an amboyna burl and birds-eye maple.

Again, the experience of using a tool designed for my hand and my eye is a pleasure one has to experience to understand.

Back to the shop.


Wednesday, 30 November 2011

Homemade slatwall an improvement over pegboard.

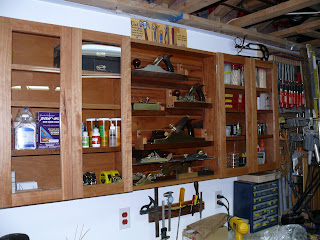
When I was building the wall storage cabinet recently, I wanted to incorporate a flexible exposed storage area for my planes. This would allow me to custom config the space to give me quick and ready access to whichever plane I wanted and a nice display option when they are not in use. Having used this setup for a few months I am very pleased with hoiw it has turned out. I am not a fan of keeping these everyday tools in a cabinet where they are more difficult to access (or see!)

One could always think pegboard as an option for this setup, however I was concerned with the weight of some of these planes as well as how the pegboard looks, well 'er like pegboard...


Home version of Guitar Store wall

I like slatwall as a wall storage option as it provides a flexible, strong and sometimes decorative wall treatment which provides ready access to the items stored on it. It is easily re-configured and there are many hardware options available at the retail level.

I did the usual web search for slatwall options for inspiration, let me tell you there was not much info out there to help me! Of course there were many slatwall options out there, some of which look really good, as well as tools and jigs to build it. However all of these are geared towards sheetgoods and larger format assemblies, mostly router-based bits that cut the slot for you. I was truly look for a homeshop remedy, so I had to design one from scratch for my use. The area I was working with was relatively small and I really wanted to use a nice material for the backdrop. I used commercial slatwall as a guide to ensure any hardware I bought would fit, so I started experimenting.

In keeping with my theme for using recycled material for this cabinet I used some leftover Tigerwood (Goncalo Alves) hardwood flooring as my slats. I started by ripping the tongues and grooves off the flooring to a finished width of 2-5/8". I removed the lacquer finish in the thickness sander, but did not reduce the thickness any more than I needed to in order to yield the depth I wanted, to avoid needing to make the lip too thin. Final thickness was 11/16" from 3/4" hardwood flooring.
   
Slatwall edge shot

After much experimenting (in pine) I settled on the following sizes for my slatwall pieces:
  • width of strips 2-5/8"
  • rabbet width - 1/2"
  • rabbet height - 1/2"
With the rabbet this size, it left a 3/16" lip which is pretty much what you need for the hardware to operate smoothly, going to 1/4" made some things too tight to sit properly and the space underneath provides clearance for the slatwall hardware when you are installing it. There is very little tolerance outside these dimensions. With the strips installed 3/8" apart all the commercial hardware I tested operated smoothly. The only real option one has is to reduce the width of strips to allow more strips per wall area, but I would not recommend going below 1-1/2" strips as you need enough material to attach to the wall and support the assembly. The rabbet size and inter-strip gap need to remain very close to these dimensions.

The next step was how to mount them, since I do not like my joinery to show, it needed to be hidden. My solution was a 1/2" plywood back cut to the opening size of the cabinet, with screws to attach the strips from behind. I cut a bunch of pine spacer strips to layout the slats on the backer board for several reasons: this allowed me ensure the strips worked out in a usable layout (not too close to bottom where slot was unusable, or close to the top where you could not insert the hangers) I had saved two strips that would be the top and bottom and cut them to width to fill the leftover gap. The other key reason for pre-layout was to allow me to draw lines on the backer board to show the exposed parts so I could finsh them before assembly. I transferred the gap lines to the edges of the plywood + 1/2" and joined them with a pencil after removing the slats. I was only using some poly here, but knew it would be difficult to finish after assembly. I also drilled two holes per slat through to the back of the plywood for reference later when it came time to screw the slats on. Then as Norm would say: "time for some assembly". Now trying to screw the slats on while keeping them lined up was going to be a challenge, so I dropped a bead of glue behind each strip, clamped them all in place and carefully flipped it over once the glue had dried. then it was a simple matter of predrilling my slats through the reference holes I drilled earlier and driving the screws.

The entire assembly was ripped to width  and inserted into the opening and screwed to the plywood cabinet backer. I inserted a couple of vertical filler strips planed to fit to hide the gaps and it was ready to go on the wall.

The planes are supported using some mounting shelves I had built many years ago which were screwed to the wall before. I had to modify them for slatwall installation and will write a future blog on this technique using store-bought metal hangers added to my shelves.

Very satisfying project, with the finished result a far nicer solution than commercial slatwall with all the flexibility and storage options this technology provides.

RDW

Tuesday, 15 November 2011

Workshop ver 2.0 complete.

This entry is about a shop reorg, but before I start I wanted to share a story.
It’s a story about a man whom I have never met, I have only spoken to him on the phone. First I should step back to the beginning. I was reading Konrad Sauer’s blog about finding some special walnut from a Kijiji search, so I decided to do a search of my own. Sure enough, a search for lumber turned up an ad for a bunch of hardwood for sale not far from my home. I was thinking of building a couple of benches and was looking for some good wood at a modest cost. The price was modest, at $2/bf for ash, oak and maple this was what I was after. I sent in an email and got a response from a woman who was helping her brother out by clearing out his home and shop, and the wood was part of the inventory. She said her brother was pretty sick and might be able to meet me at the house to help me sort through it. I borrowed a buddy’s truck and drove to the address, a nice old home on the corner of two quiet streets, in a small town like many others I have come to know in this part of the world.
The sister and a family friend led me down through a little door into a basement workshop, (the owner was too sick to come) maybe 500 sq. feet (the entire basement) filled with lumber and very little workspace to do actual woodworking – but they had wood! I was having trouble finding what I was after so the sister called the brother on the mobile and he pointed me at the good stuff. There was a bit of teak, and some walnut, which I bought all of, I was after some ash to build some benches and he had a pile of it, both 1 and 2 inches thick. I thanked him for his help and sorted through the pile to get as much as I could fit in the truck for the drive home. On my way home I could not help but think about this family selling all the tools and material from a lifetime of woodworking and felt a connection to this man through our common craft. I had the wood he bought many years ago, no doubt with plans in mind and I was continuing that vision as one woodworking generation to another. When I got the wood home and stacked, I could not help but think about its previous owner and throughout the project feel the connection through the wood to another woodworking generation: while this wood cannot tell his story, he is as much part of its legacy as I am.
I ended up with about 160’ of ash, mostly 2”, planed it up to see what I had and proceeded to mill it up to make some benchtops. Since the wood was air-dried it had quite a bit of checking, so I worked around it to minimize the waste, using the shorter bits for legs and stretchers and had the material laid out for my projects. After all was said and done, there were a couple of boxes of kindling for my buddy and not much else.
Smoothing the legs til they look like glass, that Sauer A1 is amazing!
I was not building a proper workbench, more like work tables to go against the wall to replace a couple of salvage laminated work surfaces I had been using for 12-15 years. The tops would be 2” thick and 24”x72” in size, built to the work height of 34 inches these were to become the location for most of my project layout and assembly. I did not need another workbench as I have the dream bench I built over 20 years ago I cannot do without, these would be just tables.
After lots of gluing and hernia-inducing lumber moves the tops were done, and the base built using traditional trestle bench design giving a solid foundation for many years of woodworking. Of course any shop reno is not straight-forward, not only did I need to unload the benches and find a temporary place for the riggings, I needed to paint the floor underneath (left over from workshop ver. 1.5 reno) and paint the wall behind which was necessary since I would likely not have access to them again for many years. I have been doing some work on these benches since they were finished and they are exactly what I was after; but I still cannot look at them without thinking of the wood’s previous owner, and that someday another woodworking generation will likely come to cherish the previous generations’ contributions as much as I do. Thanks Harry!


The finished work benches line the shop wall.


Planes get upgraded Storage


Plane/Tool Storage before upgrade.

As part of the ongoing workshop 2.0 project, it was time to upgrade my exisiting plane storage.  I had picked up a couple of new planes and either needed to build some new holders or breakdown and build a proper cabinet.

Now was the time to build the cabinet that would provide a nice plane display and increase the storage near the bench at the same time.
In Progress
I decided to make the cabinet out of cherry, since I was trying to use up that last piece of cherry tabletop from our old dining table I had made 20 years ago. the rest of the cherry  had gone into a coffee table for Brendan and a couple other small projects. Other than the top and bottom pieces, this is all recyled material. the cabinet is 6' long to span the complete length of the table underneath and 6" deep. The cabinet is deep enough to  serve its purpose without interfering with the benchtop work area.


Slatwall plane storage/display area

The Centre section of the cabinet is a section of open slatwall. The slatwall is made from leftover Tigerwood from my office flooring project and is mounted to a piece of plywood underlay (also salvage) and inserted in the opening. I believe it does a nice job of holding the planes both for esthetics and access.

I re-worked my plane shelves which were screwed to the wall, by attaching metal slatwall clips to the back which allows me to re-configure as necessary.


The finished cabinet with doors attached provides plenty of storage and keeps my planes right where I can reach them. I am very pleased with the result!

Ta Da


Saturday, 15 October 2011

Improving Shop Tool Storage with Mag-Bloks

Organizing tools in the shop is always a challenge for everyone. Using available space to keep every thing you need close at hand without creating clutter is always a balancing act. This post focuses on my bench tools which I like to keep close at hand on my main bench.

A while back I bought a few of the Benchcrafted One-of-a-kind Mag-Bloks. if you are not familiar with these Mag-Bloks, check them out here. I purchased some cherry ones a few years ago and they have very strong holding power, with a nice wood covering. The one-of-a-kind Mag-Bloks are offered from time-to-time on their website and are always made from unique woods - a serious weakness of mine...

Once I received these nice pieces in the mail I set them out on the bench for a few days and noodled on how to best use them. Eventually I settled on attaching them to the back of my bench for rulers, awls, screwdrivers and a few pieces I wanted to keep handy. But for me, just attaching them to the bench was not enough, I needed to upgrade them!! My solution was to insert a piece of wood between the Mag-Blok and the bench back to hold a row of hand tools. This picture shows the layout on a piece of 5/8" tigerwood and some of the tools layed out for the best arrangement.


Once I had a layout I was okay with, over to the tablesaw to dado out the openings to about 3/8" depth, this provided plenty of clearance for all the tools I was planning on storing there. This piece was then attached between the Mag-Blog and Bench using the Mag-Bloks screws and voila lots of storage for my collection of mostly cocobolo handled hand tools - I very nice setup I must say so myself.


Saws and such...


Chisels and Marking tools.

A nice addition to my bench storage without taking up too much space.

RDW

Friday, 14 October 2011

Old Plane gets new look.

This is my trusty Lie-Nielson No. 4 which I have had for many years and is probably the plane I use the most on a day-to-day basis. I had seen some of the work done by Catharine Kennedy online before and thought this trusty old standby could use some new clothes. I ripped the plane apart and sent the body and lever cap off to Catharine to do her magic. My only guidance was "less filigree and more acanthus" and I think she got it bang on.

She also engraved my initials on the lever cap, which looks great as well. Once this gets mauled a bit and the bronze patina restored it will look like the =trusty ole steed that it is - just with a new pair of shoes!


RDW

Wednesday, 5 October 2011

Beautiful new planes land in new home

I just got back from one of my all too regular trips to Toronto, but this time I got to do a little something for myself for a change. I rented a car and drove up to Kitchener to visit Konrad Sauer to pick up my new infill planes he has been building for me. More about the planes in a little bit; but first I need to say Konrad is one of the good guys in this business and a real pleasure to meet in person, after many months of online dialog.

Of course I got a tour of his awesome shop, but we had a chance to talk about everything from the business to our boys - like running into an old friend I have not seen for years. A couple hours went by all too quickly and I had to hit the road to catch my plane home.

From my reading and personal observation, Konrad is one of the pre-eminent plane builders working today - and Canadian too! His approach very much seeks a complete balance between form and function - his planes have a stunning visual presentation, as well as dreamy usability. I had a chance to look over a number of his works in progress, and there are many other lucky woodworkers out there, all sizes and styles of planes, matched with exquisite wood choices - illustrating the true artist at work.

  
The first plane I ordered many months ago was a small Norris No. 7 Shoulder plane to give me the tool to clean out dadoes as well as tenon shoulders. I picked the small one to give me the flexibility to cover most sizes. I am very pleased with this little guy, executed in Brazilian Rosewood infill and bronze sides, it looks and feel amazing in my hand. And oh yeah, it is sharp as a razor and leaves a flawless smooth edge in its wake.

After I waited a few weeks for the No. 7, I felt now was the time to replace my Record No. 6 with an infill. I use that plane for rough jointing of lumber by hand to better control the process, and often to waste less material, I will finish it with a tiny skim on the power jointer to make sure its square and flat after the plane is done. While I do not do much surface prep by hand, I feel if I had the hand tool to do so, I would go this route over other more aggressive options - like the belt sander!

This plane is an A1 Panel Plane, which serves many purposes from true jointer to flattening flat surfaces for finishing. I chose Brazilian Rosewood for the infill as I love the colour and Konrad had more from the same piece the No. 7 was made from, so why not? This picture shows this magnificent beast in all its 16.5" glory. A little shorter than the No. 6, but much heavier and much smoother to use. It takes shavings you can see through with virtually no effort.

These two planes will have a permanent place of honour in my shop as well my go-to planes for many uses. I am also sure my grandchildren will get many years of use before they hand them off to their children, a true heirloom piece I am honoured to be the custodian of for future generations.

RDW


Tuesday, 27 September 2011

Handyman Challenge project re-born

I had the somewhat misguided idea to show up for the Canada's Greatest Handyman Challenge a while back when it was in Halifax; and while I made it through to the second stage, I crashed and burned miserably. The lesson I learned was that I need the time to think an idea through and work out the technical challenges on my own timetable - stick a clock on me and a camera in my face and its a different story!!


This piece is about the project I built to get into the show, the only criteria was to build something portable from a single sheet of plywood. So me being me grabbed the challenge and used it as an opportuntity to do something very special. While plywood is not normally a fine material, I decided to use some cherry plywood I had in the shop, with the objective of making it not look like it was made from plywood.

The front carcase corners are mitred to hide the plywood edge - no edge banding allowed. Even the drawer sides are resawn from the same plywood to stay true to the rules of the contest. The top was a bit of a challenge, so to hide the edges, I mitred the three facing edges and turned it into itself to hide the edge. I was was very pleased with this and apparently so were the judges - enough said on that!


Once the sting of the experience passed I decided I wanted to use as much of this project as I could to avoid wasting all that work and material. This piece was to get a new drawer, drawer front, door front and top from solid cherry. I kept the design simple and was very pleased with the final outcome.

the design now has a decidedly shaker appearance and will serve very nicely as a nightstand in my No. 2 son's recently vacated bedroom.
Even though my TV days are over, I got to meet Mike Holmes, which was really my objective all along!!!!


Tuesday, 6 September 2011

New Article Online

The article I wrote for WoodTurning Online on the screwdrivers has been published. It can be viewed here. This article explains in lots of detail how I made these tools, including a couple of options to drill the holes and layout the blanks - Happy Turning.

Note: Read the article before you order the parts to make sure you get the right parts, others (me too) have ordered the wrong quantitites of the ferrules, so be careful.

Happy turning,

Thursday, 1 September 2011

Articles for Woodturning Online

I have been turning wood into sawdust for over 25 years now and have gained some insight into how some things are done, now it is time to share.

For many years one of the resources I have used for new ideas and techniques is Wood Turning Online. They have hundreds of articles and project ideas which are put together by other woodworkers  from around the world and shared through this site.

I was asked recently by the site operator to write a few articles for the site; the first one I put together was a simple lamination technique for turning pepper mills, which was published here. I have just finished writing another article on turning screwdriver handles which I blogged about here. It should be published soon.


Wednesday, 31 August 2011

New Plane finds Home in Caring Shop

In keeping with my recent theme of nice tools and equipment, I have been focussing on upgrading a few of my planes. Most of my everyday planes are Lie-Nielson customs with cocobolo handles. I have a Record No. 6 Fore plane that is soon to be replaced by a new custom-made infill model from Konrad Sauer from Ontario - more on that when it is complete.

A new (old) branch of toolmaking has seen very much of a renaissance over the past 20+ years: the infill style of hand planes which was very popular in the early half of the 20th century has found new life. I read a lot about woodworkers going "back" to using more hand tools to do tasks that machines have taken over and as a result "nice" handcrafted handtools are coming out of the woodwork (so to speak!) One only has to do an online search to see makers offering handbuilt custom saws, chisels (like my Blue Spruce stuff) and various marking and cutting tools designed to make sawdust. Now, old school will tell you its not the tool, its the craftsman - I agree 100%, but if you can afford it, isn't it a lot nicer to do the same job with a super-sweet handtool custom made just for you? C'mon!

Enough  of my musings....

In the world of infill planes, one name has emerged as being credited with reviving this almost lost art - Karl Hotley. Many writers in the trade credit the UK-based Hotley with setting the standard for this realm and while I am not here to argue about which I do not know, he is considered by most I have read about the pre-emminent infill plane builder today.

So of course I had to have one!!


Karl Hotley 11SA Smoothing Plane


This little darling is my Hotley smoothing plane, just 6 5/8" long is a testament to fine craftsmanship in a tool. Its dovetailed bronze sides, substantial steel sole and rosewood infill pack a lot of mass (2.4 lbs) into a small space. As I evolve (revert?) towards using more hand tools in my work, this baby will fill a nice little gap as a smoother for difficult rough stock; it just feels so nice in the hand, which makes the tedious task of smoothing a real pleasure.

Here's another look:

Side View of Hotley Smoother


While this is the first of my custom hand made planes, it is surely not the last. Woodworking for me is a pursuit of pleasure, using nice equipment built by craftsmen like myself only serves to increase the pleasure I get from my craft.

Back to the shop...

Tuesday, 9 August 2011

My own take on Nice Tools

Did I mention I like nice tools?

Buying those nice tools from Dave Jeske inspired me to do some more tool upgrades around the shop, but this time I would take on the task myself. The target this time was screwdrivers, and yes you need to be a little off to get excited about a screwdriver upgrade project....

I had bought a nice set of screwdrivers several years ago from Lee Valley (these ones) and have been generally pleased with their performance, the large guy was a bit too big for my hands so was not that comfortable - not to mention the very pedestrian look of the set, which is very important also!!

So I started where I always start, online looking for ideas. I was delighted to find that Lee Valley is selling the shafts of those same screwdrivers for just this purpose here  - I was off to the races. I was afraid I was going to have to cannibalize another set which was not going to be fun.

There are also many youtube videos and how-tos on woodworking forums, as well as folks online selling "custom" screwdriver sets. Armed with all this inspiration I sat down with pencil and paper and starting sketching, using several existing tools I found sizes and shapes that were comfortable in my hands and worked out a design.


My sketch and some nice Pau Rosa blanks
 with screwdriver handles hidden inside.

Wood choice was key here, I wanted them to be unique looking but I had O.D.'d on cocobolo so wanted something different - I headed over to see Darrell at Halifax Specialty Hardwoods to see what I could find - known as "The Wood Store" around the house, they are conveniently located to extract the most money from me. (I am really glad they moved Canadian Tire further away, it was getting too expensiive having them that close!!!!) I picked up some nicely figured Pau Rosa turning blanks in 18" lengths which would give me the three sizes for each tip from one piece.

Using the story stick I made (shown in photo above), I laid out the rounded blanks and cut the material to length. The turning is relatively straight-forward and the lathe drilling went well, so in no time I had 3 nice handles ready for assembly. Now it is quite easy to turn individual pieces, the real challenge is turning 3 sets of handles that all match in shape and size, we will see how it goes for the phillips and robertson tips.


Ready for Glue-up!


While I plan to write an article on the project, which will give all the gorey details, some folks may want to see how they go together, so this shot is the large guy ready for some glue-up with super-thick CA, notice I added a rubber washer which hides messy underparts...


 And here is a shot of the completed range of slot screwdrivers, having worked out all the kinks on this set, it will be easy to finish up the phillips and robertson sets in a day.

I am very pleased with the outcome!!

Friday, 5 August 2011

I Like Nice Tools!!

As long as I have been working with wood, I have enjoyed using nice tools. I was not always able to afford the best equipment, but as the years go by I have been able to upgrade things regularly.

I have spent quite a bit of time lately honing (:-}) my sharpening skills to get the most out of my planes and chisels. This has been a real eye opener as I now realize the difference between sharp and "shave the hair off your arm" sharp. I had purchased some water stones and a complete set of DMT diamond bench stones, which are great and simple to work with. Using the Veritas Mk. II Honing Guide gave me the control I needed to get the most out of the diamond stones; these allow me to put a mirror finish on the blades making them a dream to use on wood.

14 oz. mallet and bench chisels
 from Blue Spruce Toolworks

Now that I have a new appreciation for sharp tools, its time to upgrade to a tool befitting this new found understanding. Recently I have been acquiring some nice chisels and other small hand tools to replace some I have had for almost 20 years.  In my research online through woodworking forums and magazines I came across Blue Spruce Toolworks from Oregon, which will make custom bench tools using the wood of your choice.


Many years ago when I upgraded my hand planes and hand saws I chose cocobolo as my wood of choice for these tools, mostly bought from Lie Nielson Toolworks in Maine - this would (wood?) be my choice this time too. So I contacted Dave Jeske at Blue Spruce and ordered a load of new gear from him. He chose some interesting grain for me and when they arrived I was floored, the picture below is what I ended up with, a complete set of Bench Chisels, Dovetail chisels, Set of Skew chisels, Marking Tools and small awl - all from cocobolo and all spectacular.


Homage to Blue Spruce Tools

Since these are tools and are meant to be used and not just looked at (really that's true), they need to be good tools. Right out of the box they were razor sharp, I just ran the micro bevel over my 8000 diamond plate to polish it  up and it was time to make shavings. Everything they evoke in their appearance is magnified by their performance in your hand. the chisels were dead flat and cut like a dream, I know that my son will be using some nice chisels long after I am gone.

You can also see in the shot an awesome cocobolo magnetic strip from Bench Crafted which is from their One of a Kind Mag-Bloks collection. I bought a few of these and will do a blog on them later as I have made some jigs which enhance the usability of these already indispensable tool holders.

So what's a nice chisel without a nice mallet to pound it with? Okay let's say tap then...


Mallet Collection and Holder


These mallets include two from Blue Spruce, a 14 and a 16 oz. one for various levels of force. You will notice the large one is not cocobolo, I guess this was a snafu in the order. The middle mallet is a cocobolo one I bought in the US over 20 years ago and has the marks to prove it's been well used.

Since I had killer mallets, I needed to make a stand to have them at the ready on my bench. This holder I custom made from a piece of brazilian, some ash & wenge strips,mounted on a Pau Rosa backplate - suitable I think!


Every time I pick one of these up to use, I marvel at the craftsmanship, this only adds to the pleasure i get from spending time in my shop each day.

RDW

Friday, 29 July 2011

Workshop Introduction

This post will introduce you to my shop where I take my therapy. I have things setup pretty much the way I want after doing an almost complete overhaul which involved painting and putting down new flooring in the work areas. This is very comfortable to walk and work on and I am very pleased with the result.

The main workshop is 17' x 35' plus the lathe room at the back, a very workable size. I have never spoken to a woodworker whose shop is big enough, I am no different. As nice exotic woods get harder to get, I would like to have more room to store materials I may not be able to get in the future.

The first picture is what you see when you first walk in. This is a very busy spot with usually 5 or 6 projects underway at any given time to deal with my short attention span. This allows me to work on something else when I get bored or am waiting for glue or finish to dry on another project.

My main bench is in the foreground (more on that in a future post) which I built over 20 years ago when I had my first single car garage shop - the best and most important tool in my shop.

Lots of clamps and tools I need to do my work.


Workshop View from Main Door - click for larger view
The view below from the back corner near the lathe room shows the secondary bench which provides more work surface for multiple glueups or project storage. Also here is my smaller lathe for pen and small spindle turning, much easier to do fine work with this smaller form factor.


Workshop view from Lathe Room - click for larger view
  The lathe room (below) is a small 10x14 bay which keeps dust and shavings reasonably well contained. This also contains quite a bit of my turning wood storage once it has air-dried in the shed, it comes inside to dry completely before turning.


The Lathe Room - click for larger view
 An introduction to the shop which will be expanded on in the future as I talk more about key things as related projects take shape.

For now, you can visit my pbase directory which has some shots of some projects from the past:  here and some of the instruments I have built here.

Enjoy and keep making shavings....

RDW

Thursday, 28 July 2011

First Post

This is my first attempt at doing an ongoing blog. We have blogged a few of our trips in the past and struggled to keep them up to date, so I know going in this will be sporadic at best.

Stay tuned, I hope this will be interesting for others.

RDW